
 Let's start things off by explaining what Amazon Web Services (AWS) actually is and why it's useful to you as a Java programmer.
Amazon Web Services are a bunch of “products” that Amazon is offering to make our lives as programmers easier.
These products come in the form of web applications that help us to do the “un-fun” stuff of programming.
Mostly it involves what we call the “dev ops” (development operations), which are the processes that we use to make sure that our code can be properly enjoyed by all of our users.
To put it simply, AWS helps us to put our applications on the public web for anyone to access and enjoy.
Typically when we're coding, we're firing up a web server privately on our own laptops / desktops. We have a Tomcat server installed somewhere that runs our code on localhost:8080 and we code like happy little monkeys.
But what happens when we finish our application and we're ready to show it to the world? Sure we can upload it to GitHub, but that's only to be enjoyed by other programmers… we want our family and friends (and complete strangers) to use our apps and tell us how amazing we all are, right?
Right.
You get the idea.
Overview
Here's a quick overview of this ultimate guide so that you have a 10,000 foot view of what we're going to be talking about:
Step 1: Sign up for AWS
Step 2: Create a Tomcat Server with Elastic Beanstalk (an AWS “product”)
Step 3: Prep your code for deployment to Elastic Beanstalk
Step 4: Deploy your code to Elastic Beanstalk
Step 5: Create a Database in AWS using Amazon RDS
Step 6: Configure the Amazon RDS Instance
Step 7: Connect your code to the RDS Instance
Step 8: Point a Domain Name to your Fancy new Hosted Application
Step 9 (Optional): Create an SSL Certificate and Tweak your Settings
Once you've gone through all of these steps, you'll have a fully functional cloud-based Java web application hosted with Amazon Web Services.
You smart little monkey you!
Cost / Pricing
One thing that people worry about is: how much is this going to cost me?
It's funny that as programmers we're so worried about paying for products and services related to programming. I'm not sure where that kind of thinking came from, but I really think it's a bit poisonous. We're always reaching for the free alternatives, but they're often either much more complicated to use, or they're just not a useful in general.
But having said that, AWS has set things up so that you can use all their services for free for 12 months… well… mostly… To be more specific, you can use one instance of each of their services for free for 12 months. That means you can create one Tomcat server, one database, one “hosted zone” etc. for free for 12 months.
You see, Amazon bases pricing off of hourly usage. So they'll give you around 744 hours of free usage per month for all of their products / services. This means that if you launch two Tomcat servers, you'll be using about 1,488 hours per month, which means you'll be paying for 744 hours of Tomcat usage.
They also have a graduated cost structure, which means that you can choose to pay less for less powerful “servers” or pay more for gradually more and more powerful “servers”. As of the time of posting this article, a “micro” instance (which is a Server with 1 Gig of RAM) goes for about $0.012/hr (or about $8.64/month). A micro instance is great for a development environment and even a small production environment if you don't have any active users.
For a full list of their prices, you can check out this page.
Step 1: Sign Up for AWS
In order to get started, you'll need to sign up for an AWS account.
This can be done via aws.amazon.com
Find the button on the screen that says something like “Create an AWS account” or “Sign into the Console”. Usually it's in the top right.
This should take you to the account creation / sign in screen that looks something like this:
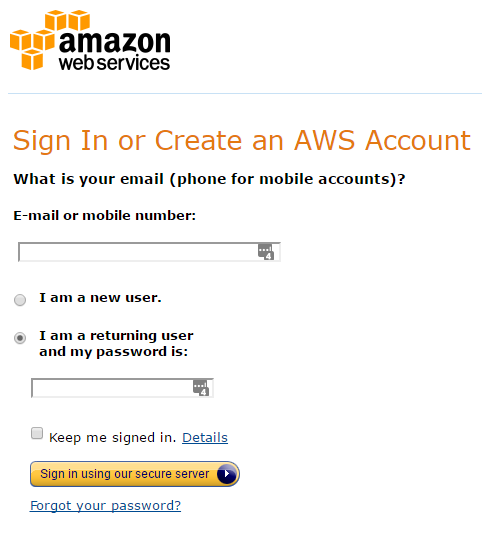
If you already have a regular Amazon account (like the one you use to shop on Amazon), then you can use this account to just sign in and get the process started.
Otherwise, click on the “I am a new user” radio button and type in an email address to create a new Amazon account.
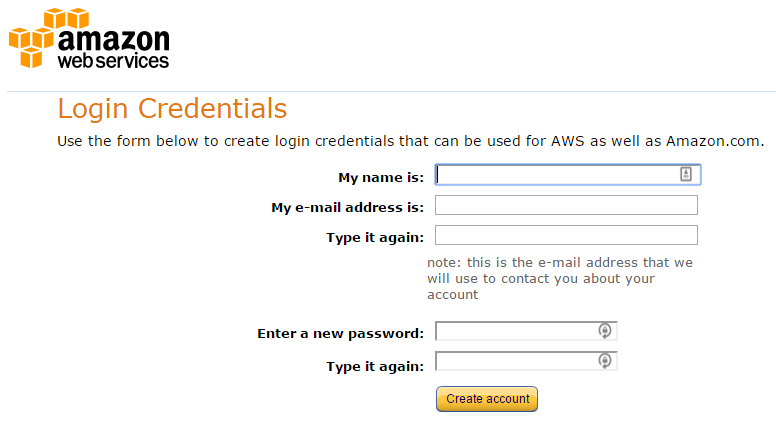
If you're creating a brand new account, then you'll need to fill out some account information (name / email address / password) on the next screen. It should look something like this:
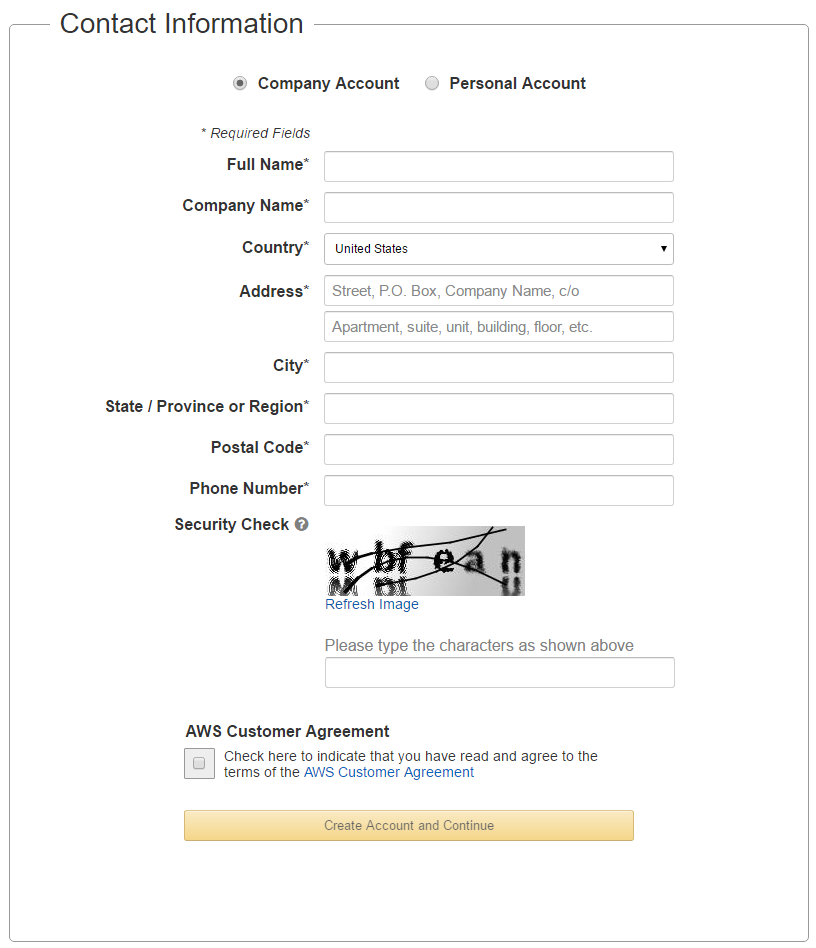
Next up is the screen you'll see if you just logged in with your existing Amazon credentials (or if you just filled out the previous screen with your new account information).
Here you'll need to tell AWS more about yourself or your business.
If you're creating this account for your business, then choose the “Company Account” radio button. If you're just signing up to use this for your own personal reasons (like creating apps for fun or just for learning purposes), then choose “Personal Account”.
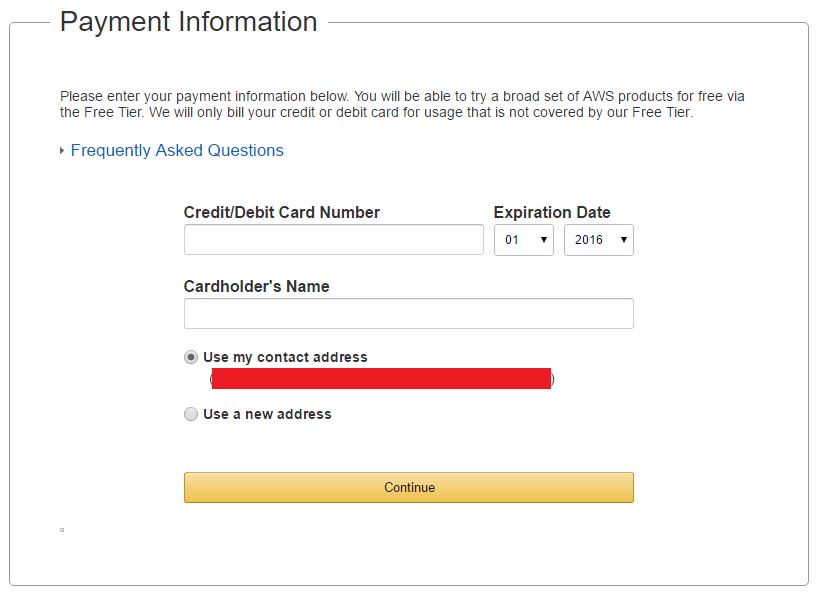
Once you've filled out all your personal / business information, you'll need to give them your payment information.
Keep in mind that so long as you follow my instructions in this post, you shouldn't be charged anything for using AWS for the first 12 months… keep in mind, this is not something I can guarantee and I don't take responsibility for any charges you may incur through your usage of AWS. I can only be a guide to ensure you won't be charged for the first 12 months by taking advantage of the AWS free tiers. Also keep in mind that the 12 free months offer was available as of the time of the posting of this article (in late 2016 / early 2017).
Okay, having said that, here's the screen you'll be presented with when needing to fill out your payment information:
Next up, you'll need to confirm your identity by receiving a phone call and either saying or typing in a PIN that you're assigned. Go ahead and fill out your phone number and press the “Call me Now” button.
Once you hit “Call me Now”, you'll be presented with a pin on a screen that looks like this:
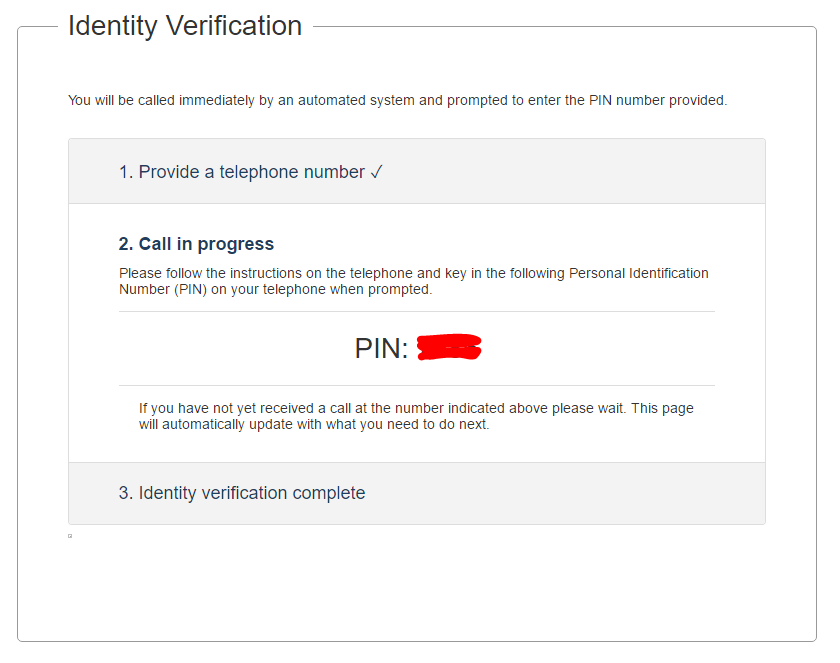
When your phone rings, pick it up and type in that PIN (or say it out loud) to verify your account.
When you've successfully entered your pin, you'll see this screen:
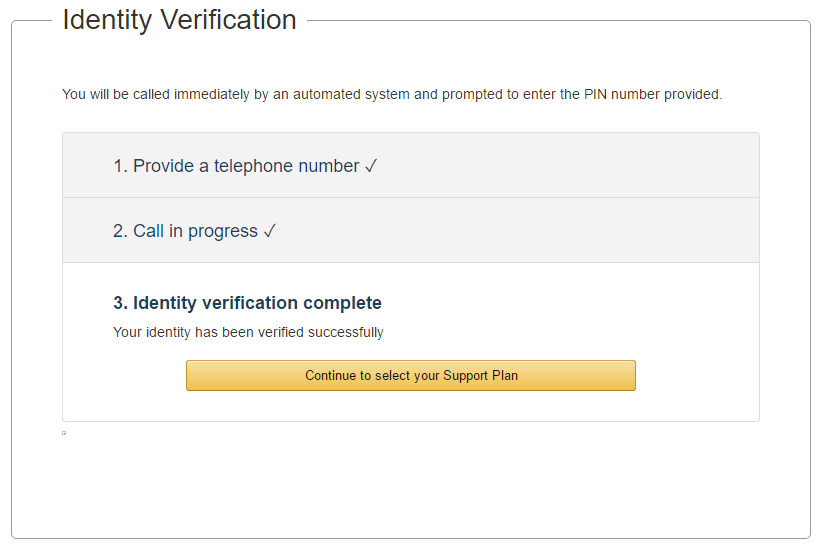
Go ahead and click on the button that says “Continue to select your Support Plan”.
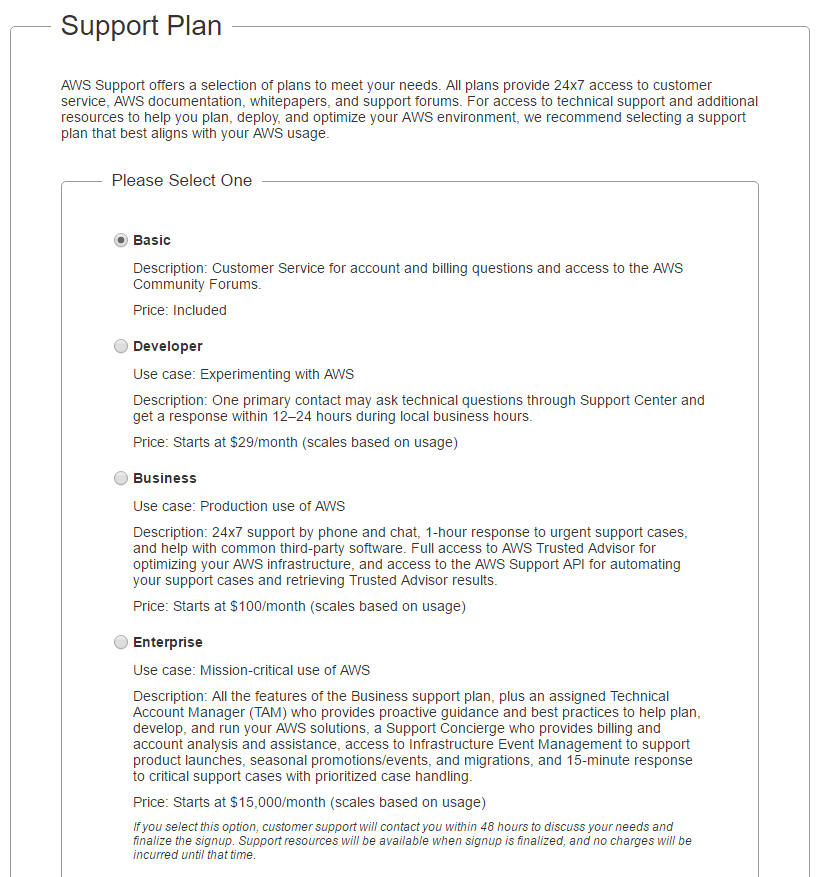
Amazon Web Services offers a bunch of support plans that gives you the opportunity to have access to an Amazon employee who can help you to set everything up. Generally speaking, unless you're a large corporation, you probably won't need to choose anything other than their basic support plan (which is completely free) and gives you access to their online documentation.
Here's what that screen looks like (not pictured is the yellow “continue” button at the bottom of the screen):
And voila, you are now done creating your account!
You can now go ahead and login to the console by clicking on the “Sign in to the console” button. This will bring you back to the login screen that we started on initially. You can type in your account information that you created previously to login to your AWS dashboard.
Once you've signed in, you should see a Console / Dashboard that looks something like this:
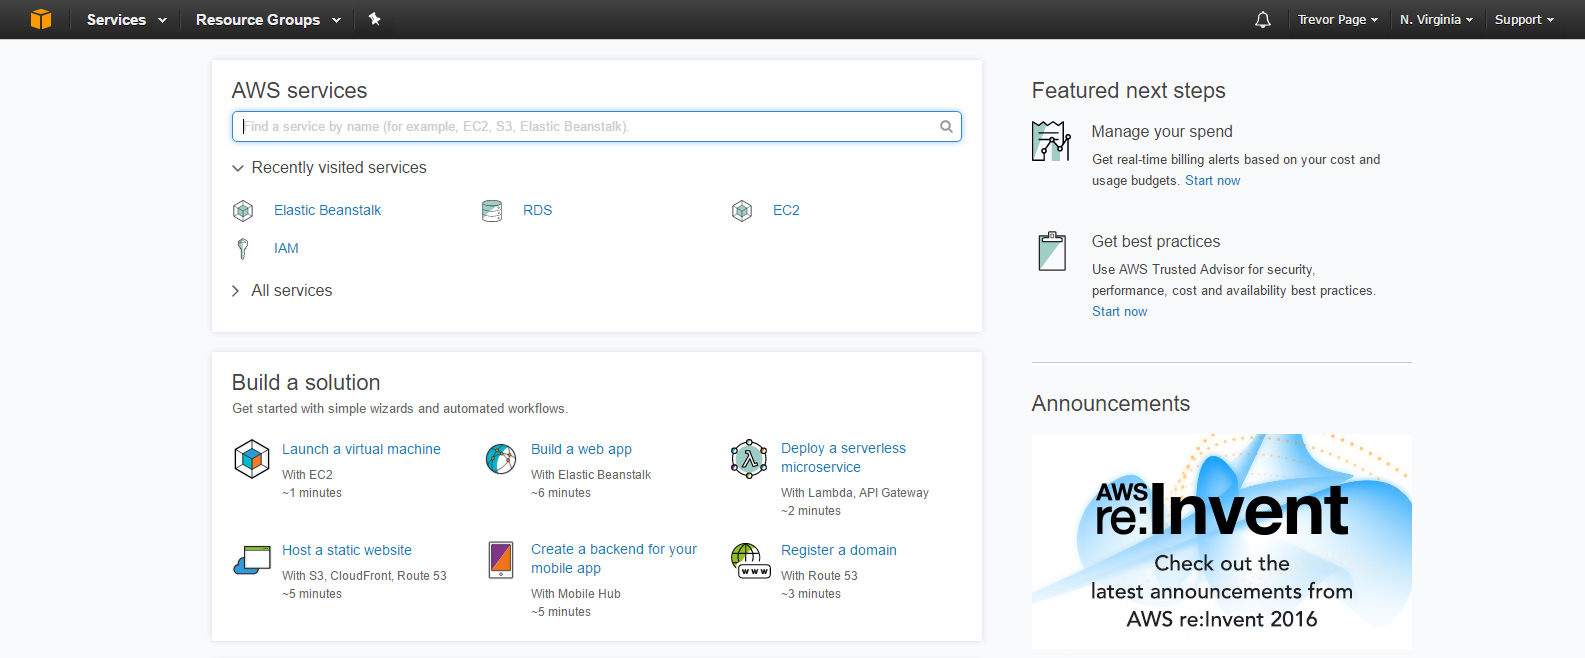
Again, keep in mind that Amazon will likely make changes to their views over time, so your dashboard might not look exactly like the one pictured above.
Alright! Congrats on getting signed up and logging into your dashboard for the first time.
The next step is to create a Tomcat server using Amazon Web Services “Elastic Beanstalk” product.
Create a Tomcat Server with Elastic Beanstalk
Alright, so next on your “todo” list should be to create a Tomcat server on an Elastic Beanstalk instance.
What's essentially going to happen here is that we're going to create a virtual server in the cloud (an instance) that will be running a Tomcat server.
Typically what happens is that you'll create a Linux server with about 1GB of RAM. This is known as a t2.micro instance, and it's part of Amazon's free tier offering.
To create this server, here's what you do.
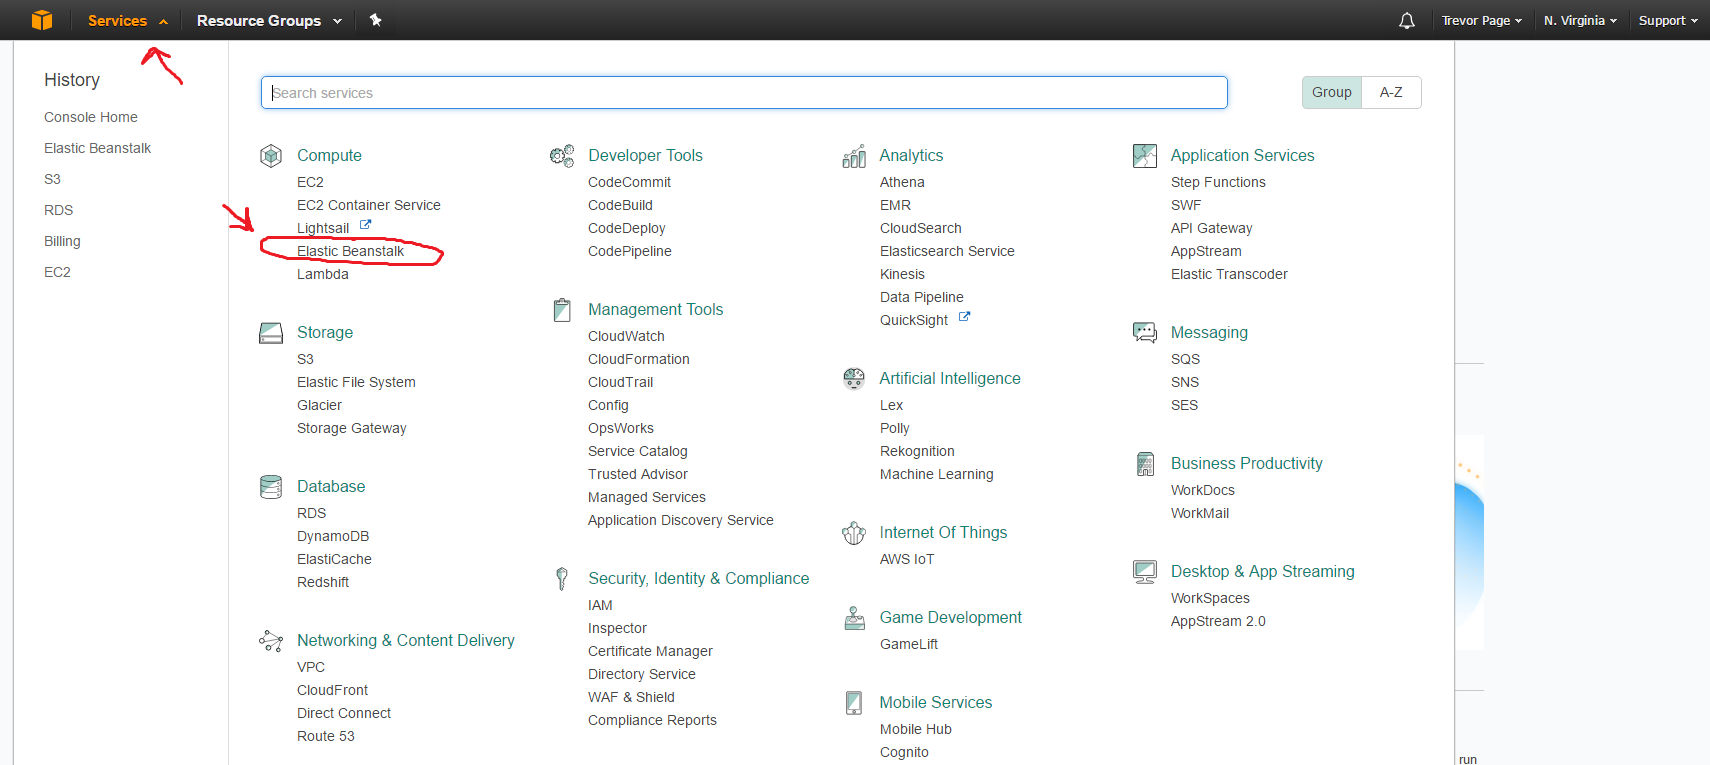
First login to your AWS dashboard and navigate to Elastic Beanstalk by clicking on the “services” menu in the top right, then click on “Elastic Beanstalk” (in the “Compute” section).
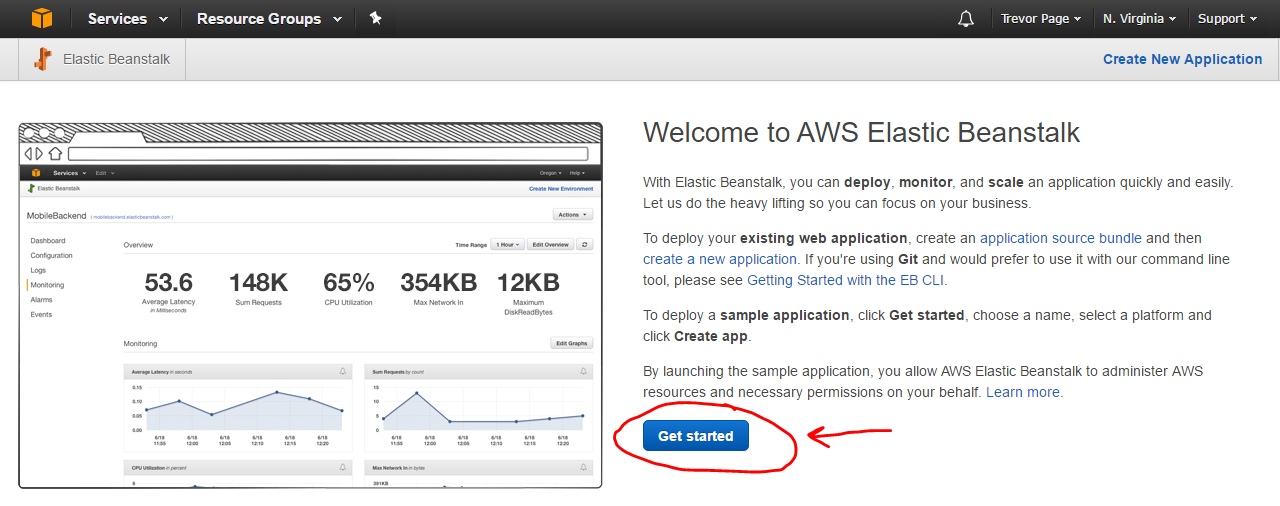
Once in Elastic Beanstalk, you'll be presented with a “getting started” screen. All you need to do to get going is to click on the “Get Started” button (or on the “Create New Application” link in the top right).
On the next screen, you'll need to enter a few simple details to get your environment up and running:
- Specify the name of your application (this is typically the name of the product/project that you're building)
- Choose your platform (In our case, since we want to launch a Java web app, we'll use a Tomcat platform)
- Finally, you can choose to launch a sample application or your own WAR file (We'll start with a sample application for now, we can easily change this later)
Once you click the “Create Application” button, AWS will be hard at work creating your environment for you.
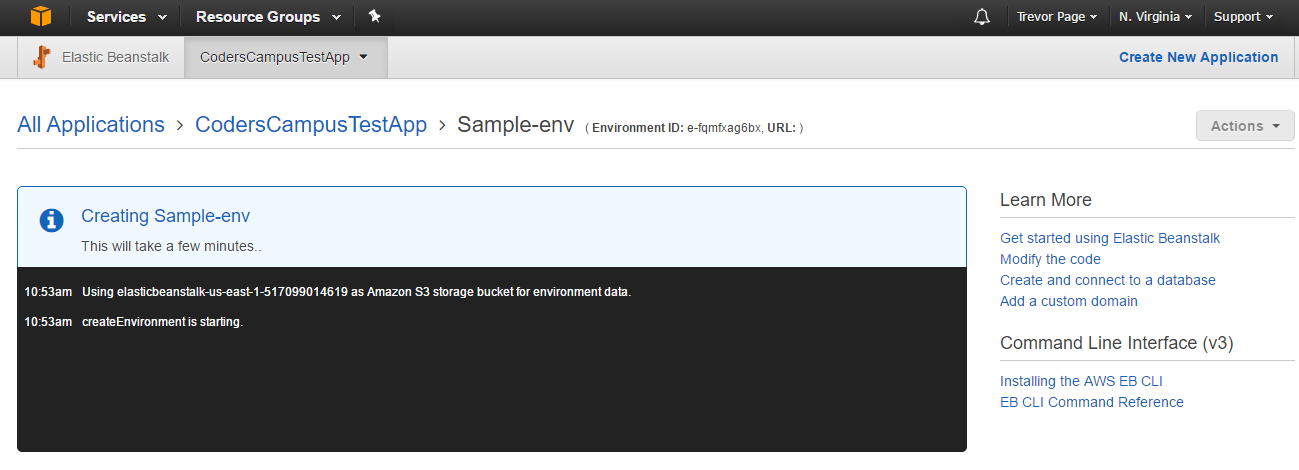
This part usually takes about 10 minutes to complete, so you might want to get up and grab a bit to eat while it's working.
Once AWS finishes its work, you'll be presented with a screen that you'll become very familiar with:
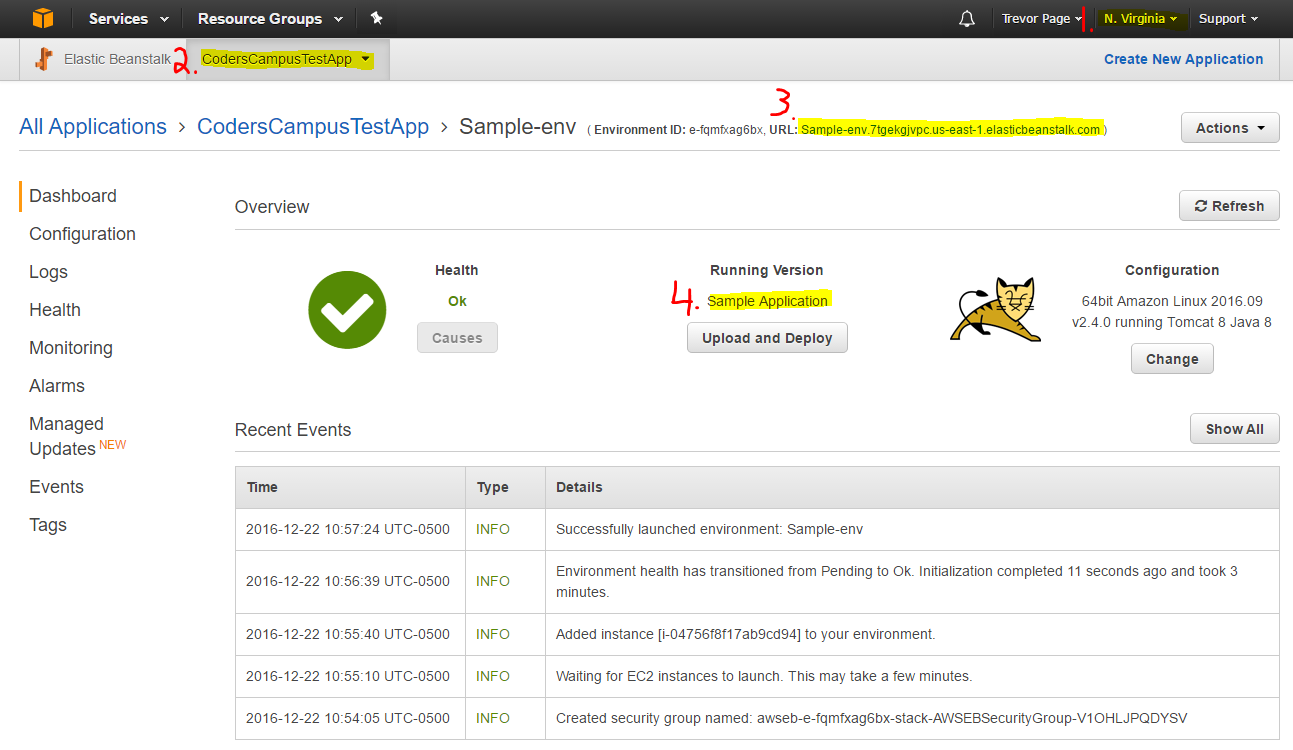
This is the main Elastic Beanstalk screen for your application.
There are four main things to take note of…
- The region that your instance exists. In our example I chose the North Virgina region (aka us-east-1). If you change regions, then you won't be able to find your elastic beanstalk instance that you just created.
- Your app's tab. If you have many applications running in the same region, you'll be able to switch between them via this tab
- Your app's URL. When you visit this URL, you'll see your application in all its glory (screen-shot of our sample application running pictured below)
- Your app's version. Right now we're just running a sample app, but once you launch a real application, you'll need to specify unique version numbers for each build.
Okay, now that you've launched your app and you've taken note of the important information on this screen, go ahead and click on your app's URL to see it in action:
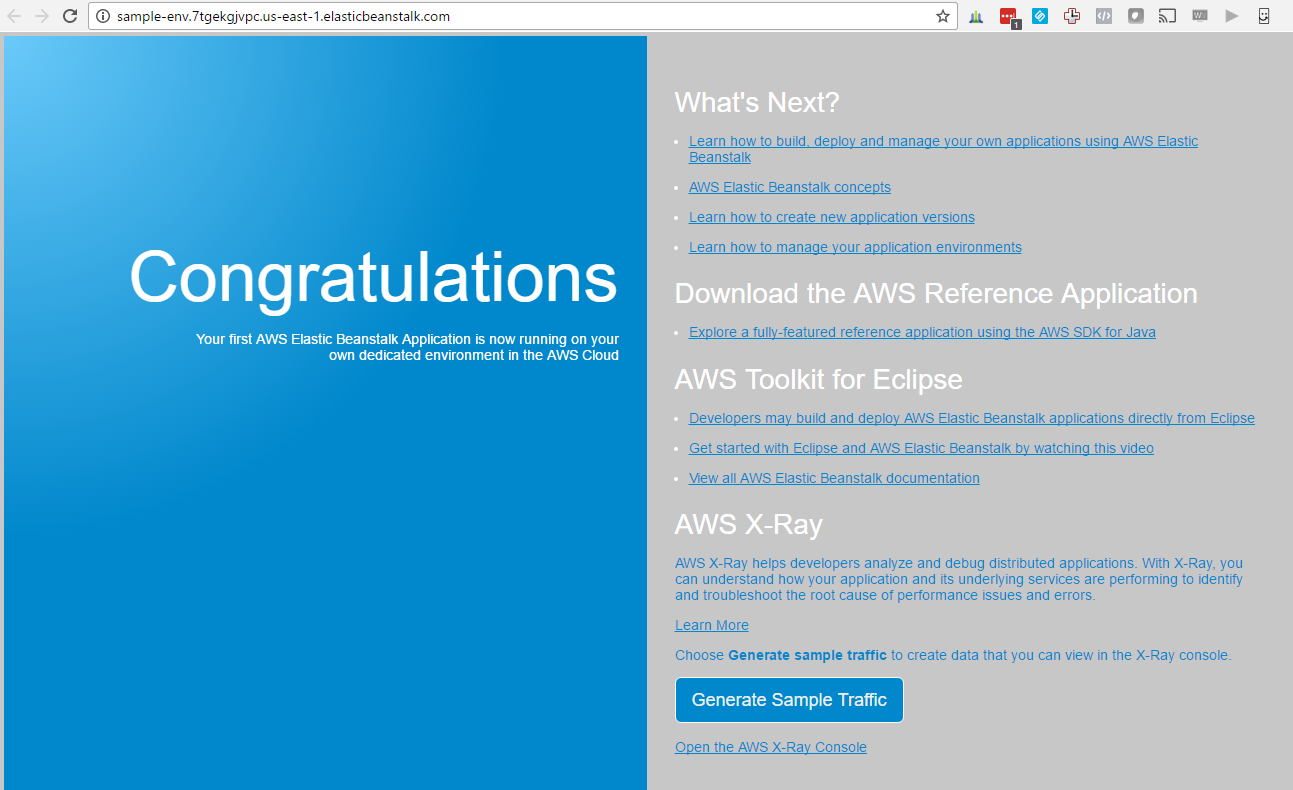
Kinda cool right?
You just launched a Linux server with Tomcat installed on it, and it's now running a sample application which you can visit via your app's unique public URL!
Before we jump into what needs to be done to launch your own code onto this server, let's take a look at some other important configuration options for your new cloud environment.
Go ahead and click on the “Configuration” tab on the left side of your Elastic Beanstalk screen:
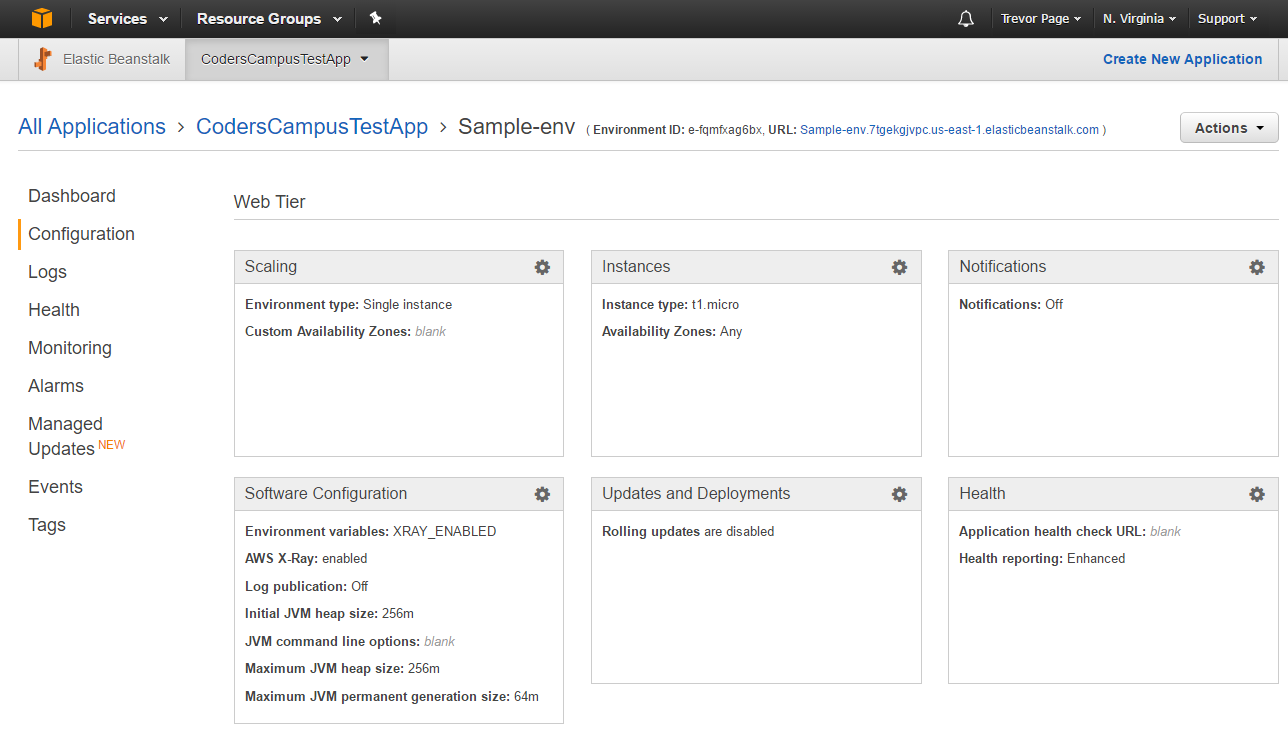
The first thing I want to show you is how to change the instance you're running.
As you can see from this screenshot, you're running a t1.micro instance… I think this instance is slightly less powerful than the t2.micro, but both instances are free.
So let's have a look at how to change over to the t2.micro instance.
Click on the gear icon in the top right of the “Instances” box:
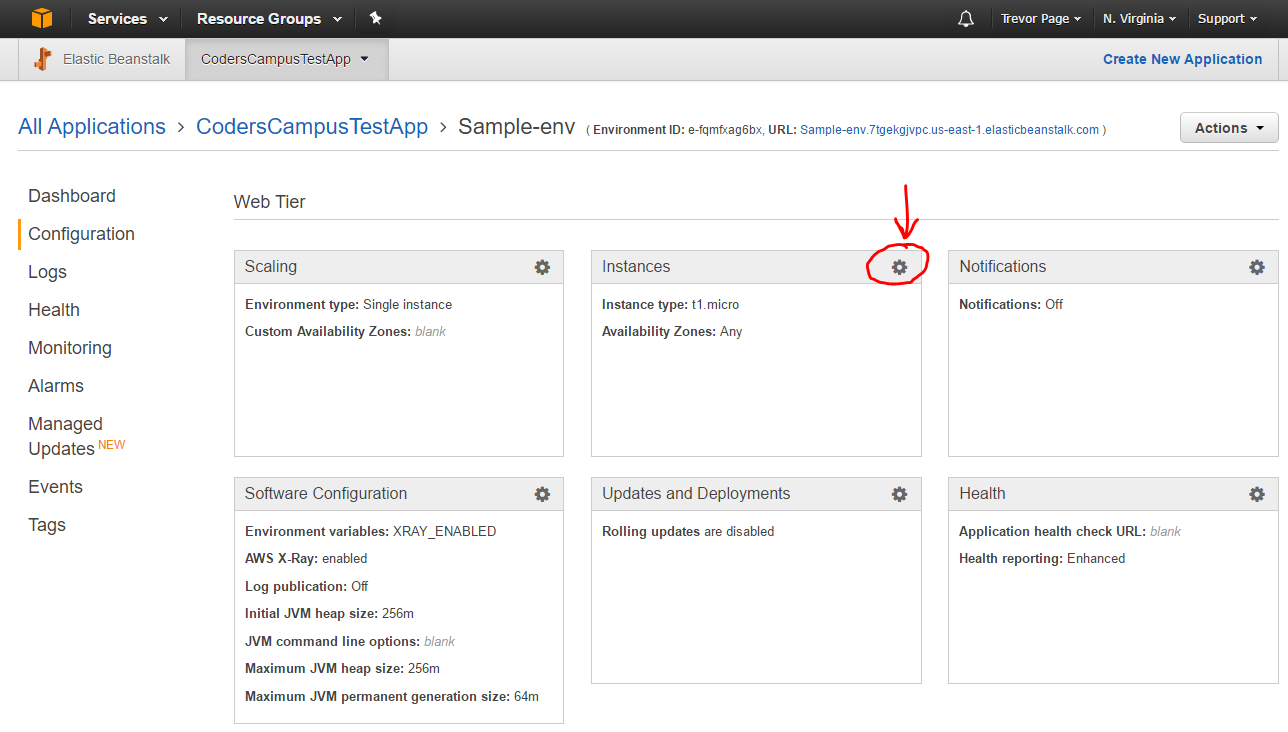
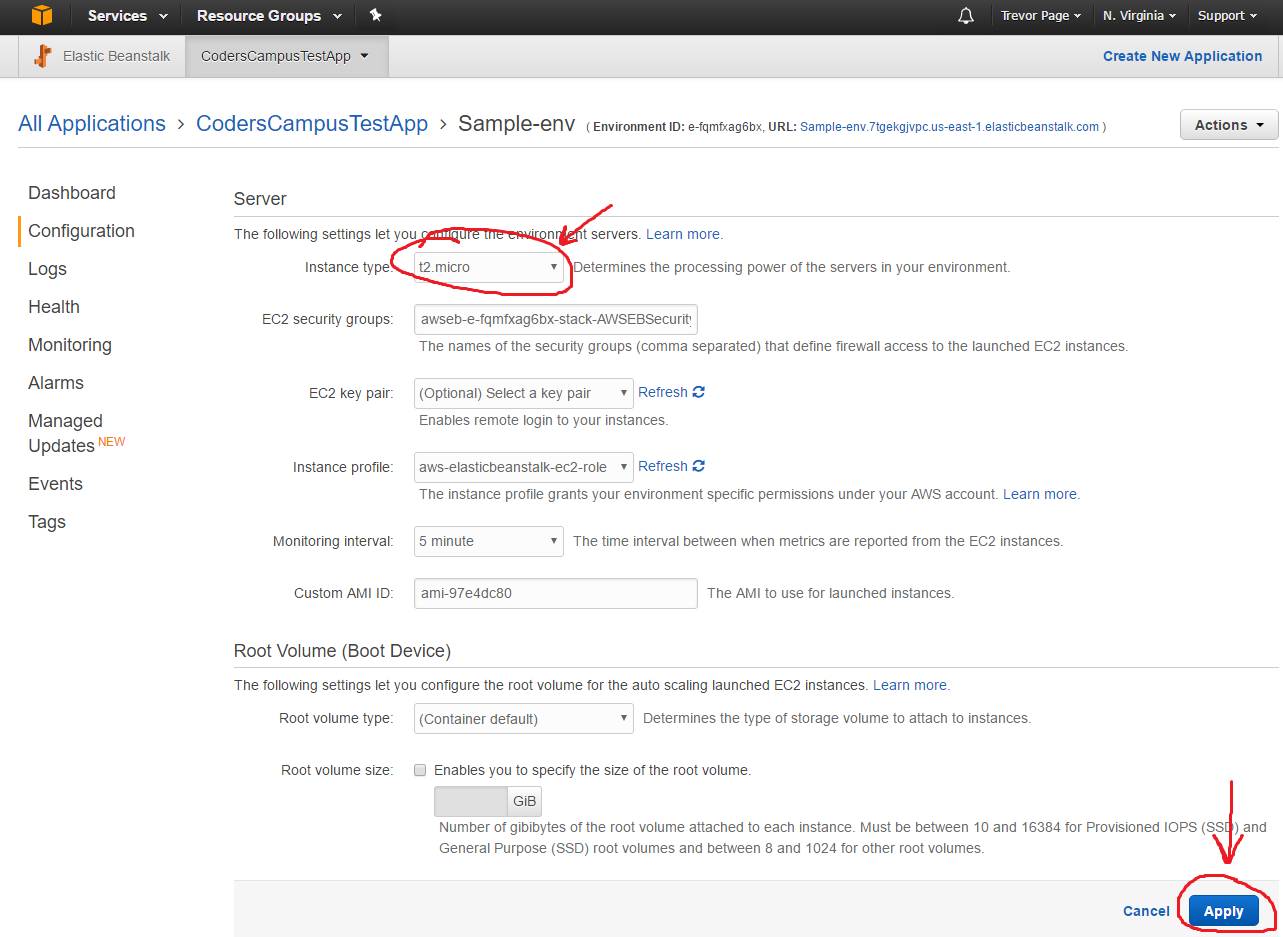
This will open up your instance configuration options screen where you'll be able to change from a t1.micro to a t2.micro instance.
Just click on the drop down next to the “Instance Type” label and change your selection to the t2.micro instance and click on the “Apply” button in the bottom right:
Don't worry too much about messing this step up, because you will be shown a screen that will ask you to confirm that you'd like to switch instances:
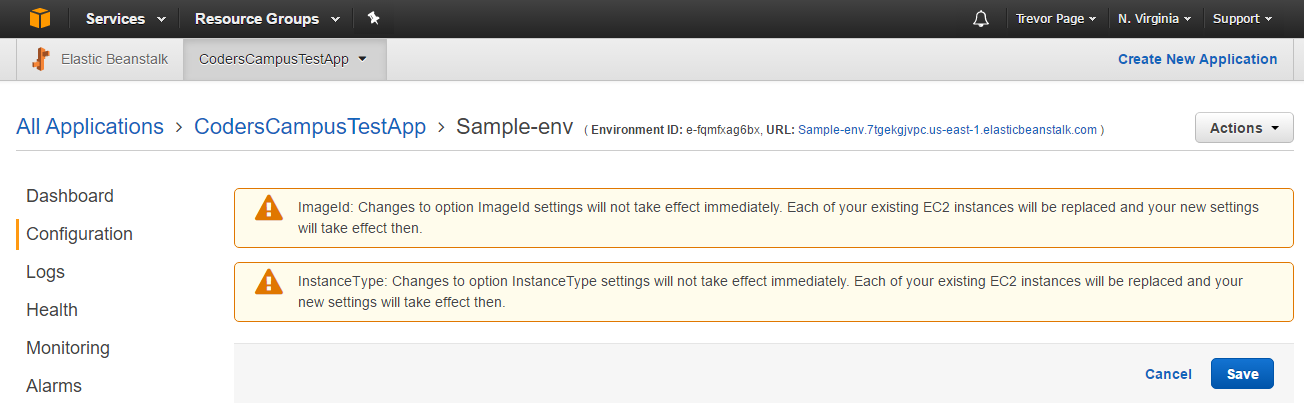
Note: If you're switching to a non-free tier, it will say so on this screen. If there's no warning telling you that you're switching away from the free tier, then you're good to go.
Note: Keep in mind, if you were running an actual live application, this would bring you app down for around 10 minutes while it launches a new instance.
Here's the screen you'll also become accustomed to seeing; the “environment updating” screen:
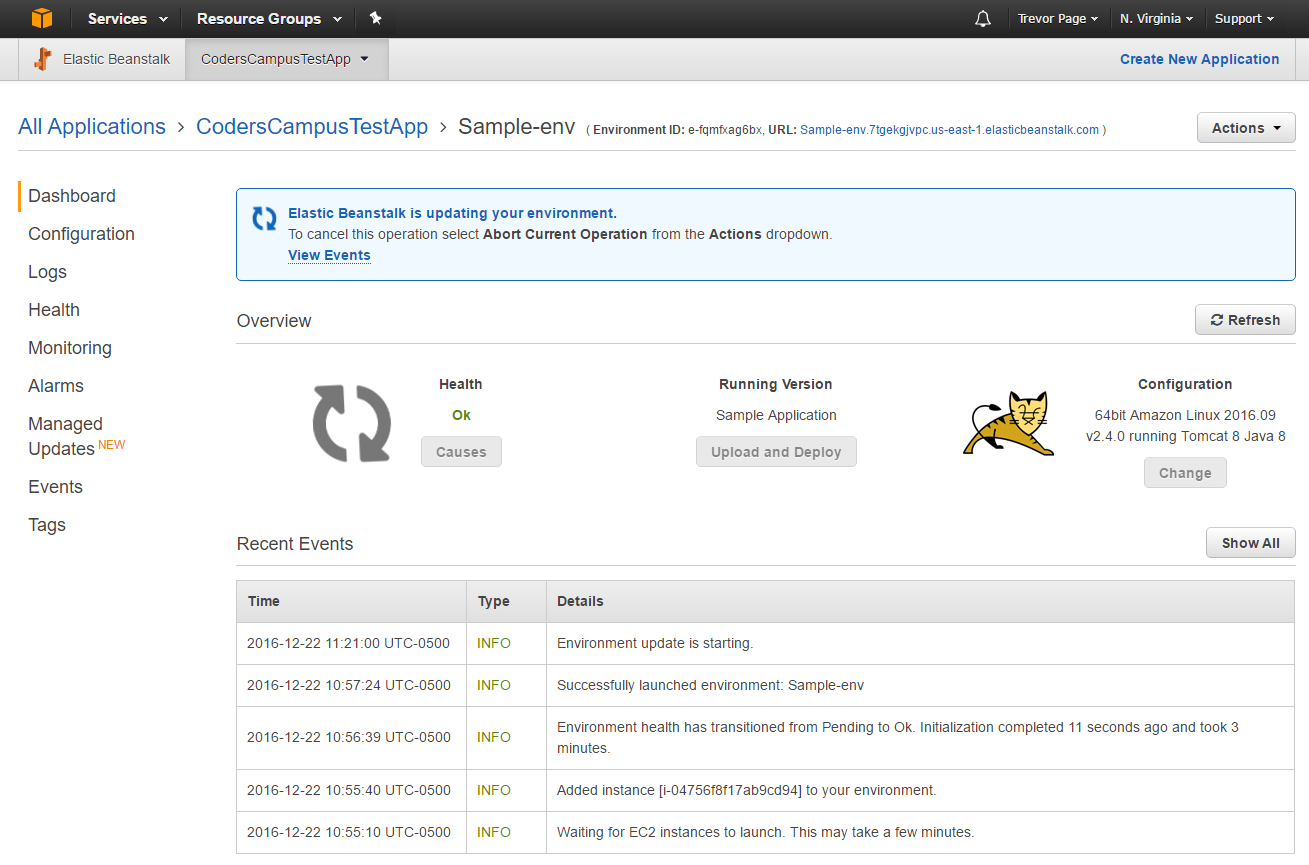
Once your new t2.micro instance is ready to go, you'll see that your screen will change from the “INFO” status to the “OK” health status.
Congrats! You've now just upgraded your instance to a slightly more powerful one with a bit more RAM.
Step 3: Prep Your Code for Deployment to Elastic Beanstalk
Boo yah! You've got a running instance in elastic beanstalk… but it's not really exciting, because it doesn't actually contain your application's code yet.
So let's resolve this issue!
There are two possibilities that could unfold here:
- Either you have created your application using Spring Boot
- Or you haven't created your application using Spring Boot
If you fall into camp #1 (i.e. you created your app as a Spring Boot application), you've already done everything you need to do in order to make your code deployable to Elastic beanstalk. Congrats! Now you can move onto Step #4.
If you fall into camp #2 and you didn't create your application using Spring Boot, there may only be one thing you need to do in order to make things work properly.
First thing is to just create a deployable WAR file from your project… this is usually done my invoking a Maven Install on your code-base. Make sure that you've got your maven pom.xml file set to deploy as a WAR and not a JAR (this is found in the <packaging> section of the pom file)
You can then take that WAR file and upload it to Elastic Beanstalk and see if it works… For my case, I wasn't so lucky. When I deployed my WAR file, the application didn't boot up properly. I didn't see any obvious errors or warnings, I just had a blank website when I visited the endpoint URL. So I had to try something different to get it working.
Now, I can't speak to ALL the different scenarios that could arise here, but I can fill you in on the problem I had when I tried to deploy an old app into the cloud.
What I did to fix my “blank website” issue was just convert my existing project over to a Spring Boot application.
There's some documentation on how to do this on Spring's website via docs.spring.io
The basic idea there is that you replace your existing class that contains your main method with the Spring Boot version.
Spring Boot's version looks like this:
@SpringBootApplication
public class Application extends SpringBootServletInitializer {

    @Override
    protected SpringApplicationBuilder configure(SpringApplicationBuilder application) {
        return application.sources(Application.class);
    }

    public static void main(String[] args) throws Exception {
        SpringApplication.run(Application.class, args);
    }

}
But again, you might need to do some further tweaking to your code-base, so be sure to follow the instructions in the Spring documentation link above.
Step 4: Deploy your code to Elastic Beanstalk
Now that your code is prepped and ready to deploy to AWS, I'll show you how easy it is to deploy your code.
Deploying Code Step 1: Make Sure You Create a WAR File
The first pre-requisite step here is that you've set up Maven to deploy your project as a WAR file (instead of a JAR)
This can be seen inside of your pom.xml file under the <packaging> setting. It should look something like this:
<?xml version="1.0" encoding="UTF-8"?>
<project xmlns="http://maven.apache.org/POM/4.0.0" xmlns:xsi="http://www.w3.org/2001/XMLSchema-instance"
	xsi:schemaLocation="http://maven.apache.org/POM/4.0.0 http://maven.apache.org/xsd/maven-4.0.0.xsd">
	<modelVersion>4.0.0</modelVersion>
	<groupId>com.proffesso</groupId>
	<artifactId>proffesso-core</artifactId>
	<version>1.5.1.12</version>


	<packaging>war</packaging>

	<name>CourseCreation</name>
	<description>CourseCreation project for Spring Boot</description>
</project>
Deploying Code Step 2: Run a Maven Install
Your next step is to actually have maven package your code together into a deployable WAR file.
Thankfully Maven makes this easy.
- Right click on your application's root project folder inside of Eclipse / Spring Tool Suite.
- Choose Run As
- Choose Maven Install
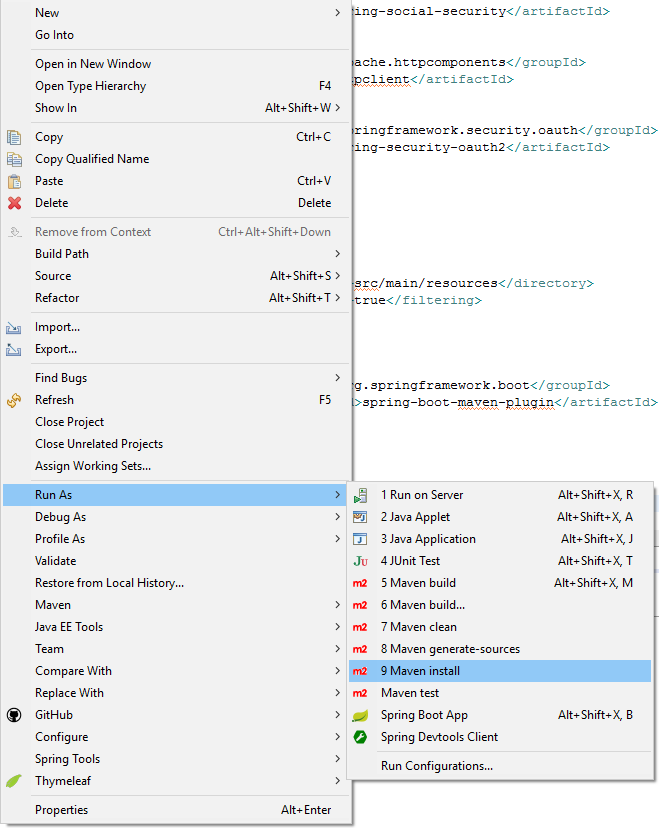
Once you do this, Maven will get to work creating a WAR file for you to deploy.
This file is typically created in the “target” directory of your app's directory… but Maven will tell you where this file has been created in the logs.
Here's a screenshot of what to look for in order to find your WAR file:

Now it's just a matter of logging into AWS, navigating to your app in Elastic Beanstalk and Updating your app by uploading this WAR file.
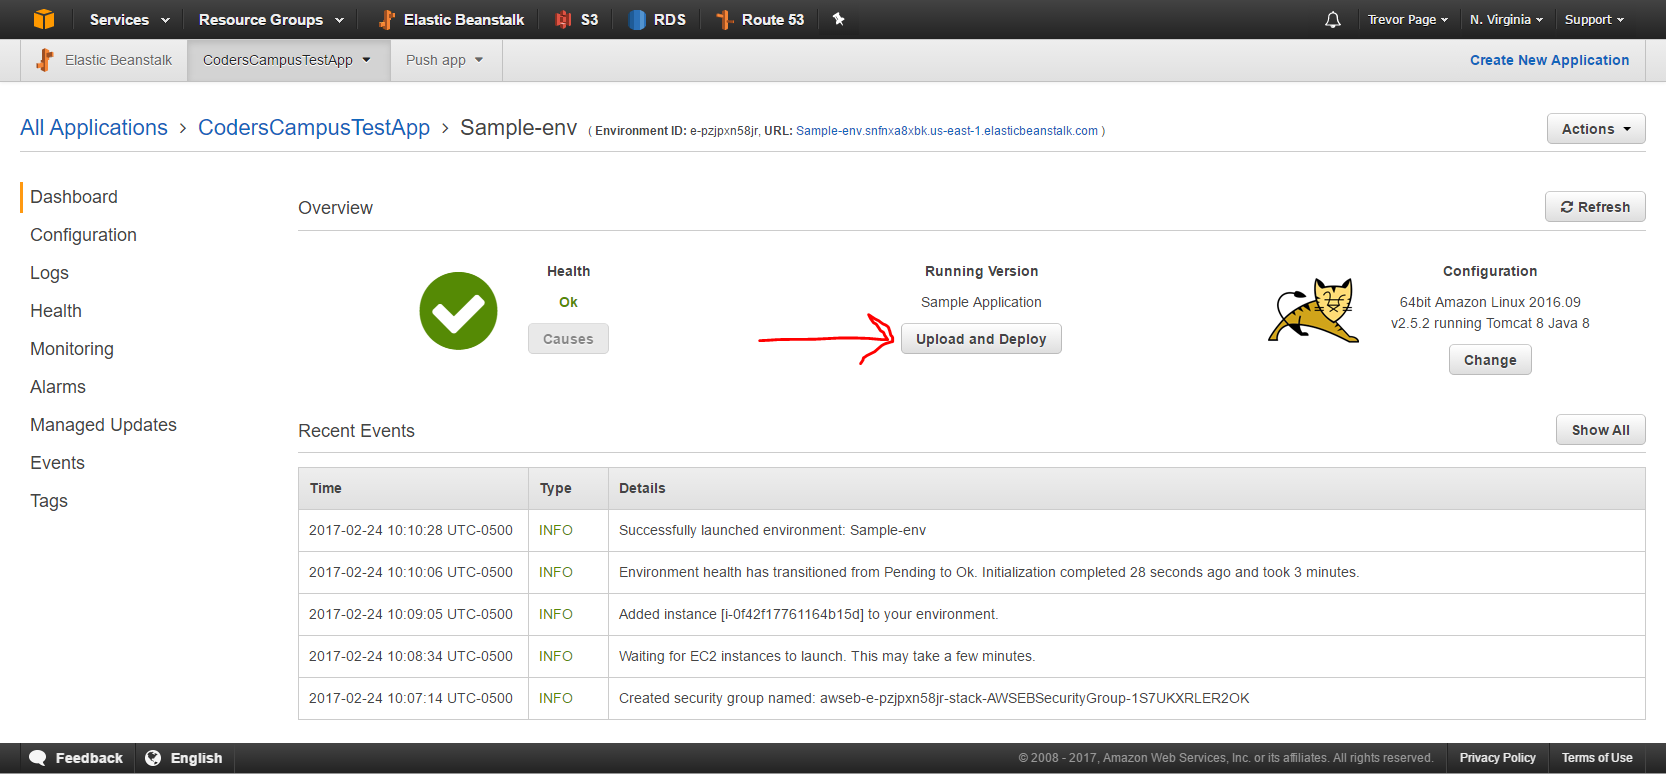
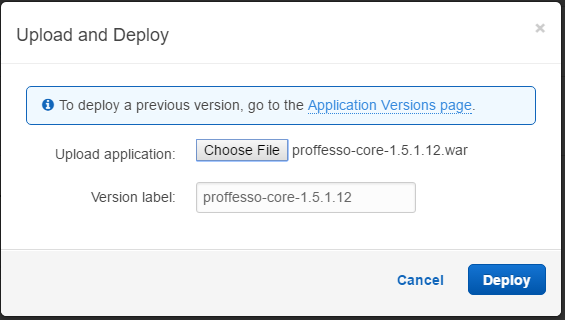
Hit that big beautiful blue “Deploy” button and your WAR file will be uploaded to Elastic Beanstalk and deployed before your very eyes!
Once the WAR file is uploaded, it typically takes around 60 seconds to process it and deploy it to your server. So just sit tight and watch AWS do it's magic and transition from the warning state to the “OK” state.
Once the health is back to “OK”, you should be able to visit your unique URL for your website and see the fruits of your labor.
Create a Database in AWS using Amazon RDS
Sweet, so if you've follow all the instructions up to this point, then you've launched your application into the cloud!
But…
You still need to hook it up to a database, and if you were using a reference to localhost:8080 for your database connection string, then this newly launched cloud application isn't going to work properly.
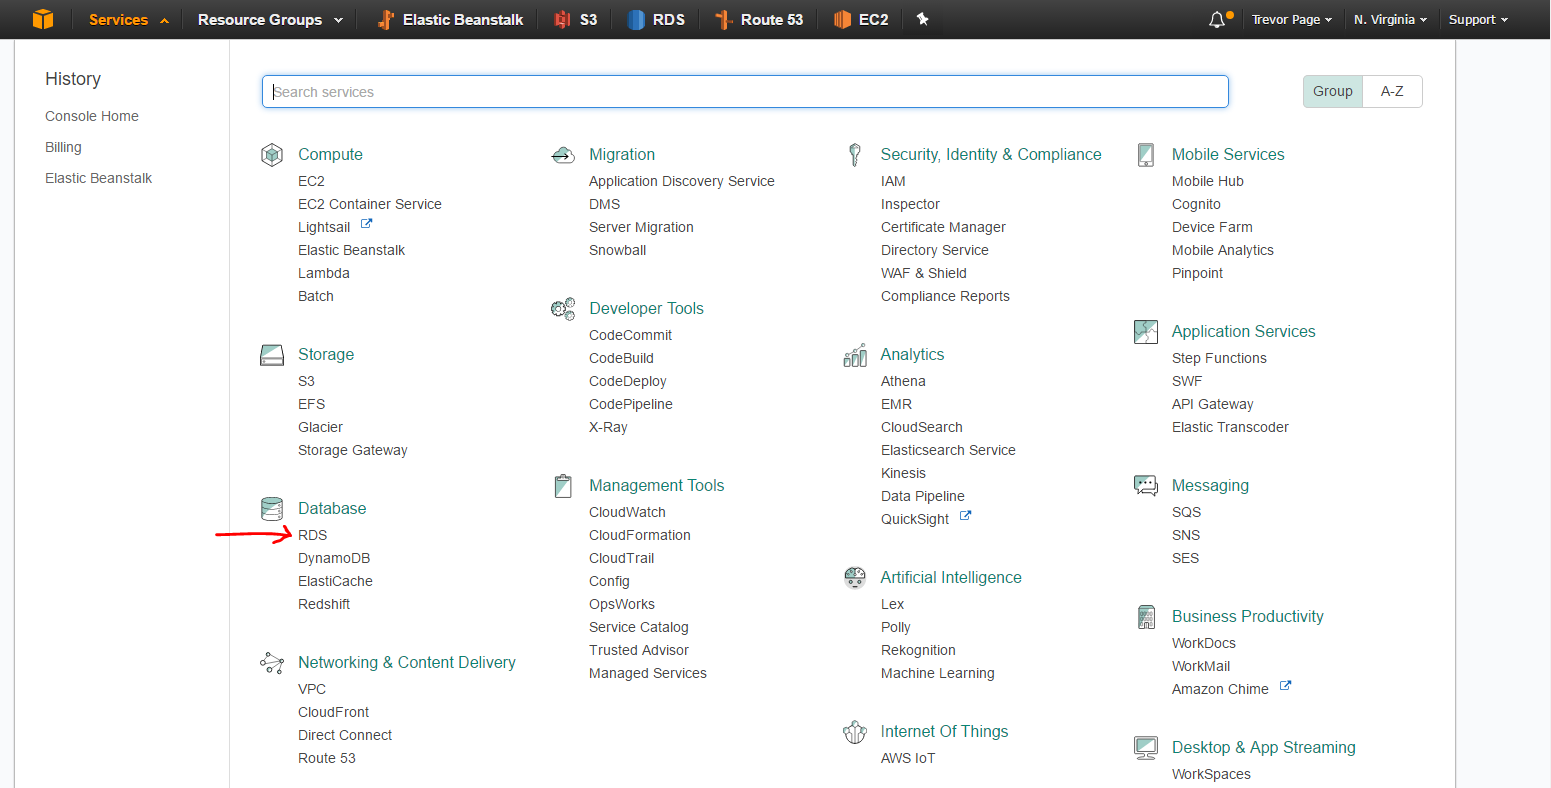
To solve this problem, we'll need to dive into how we can launch a database in the cloud using Amazon RDS.
Navigate to the RDS product:
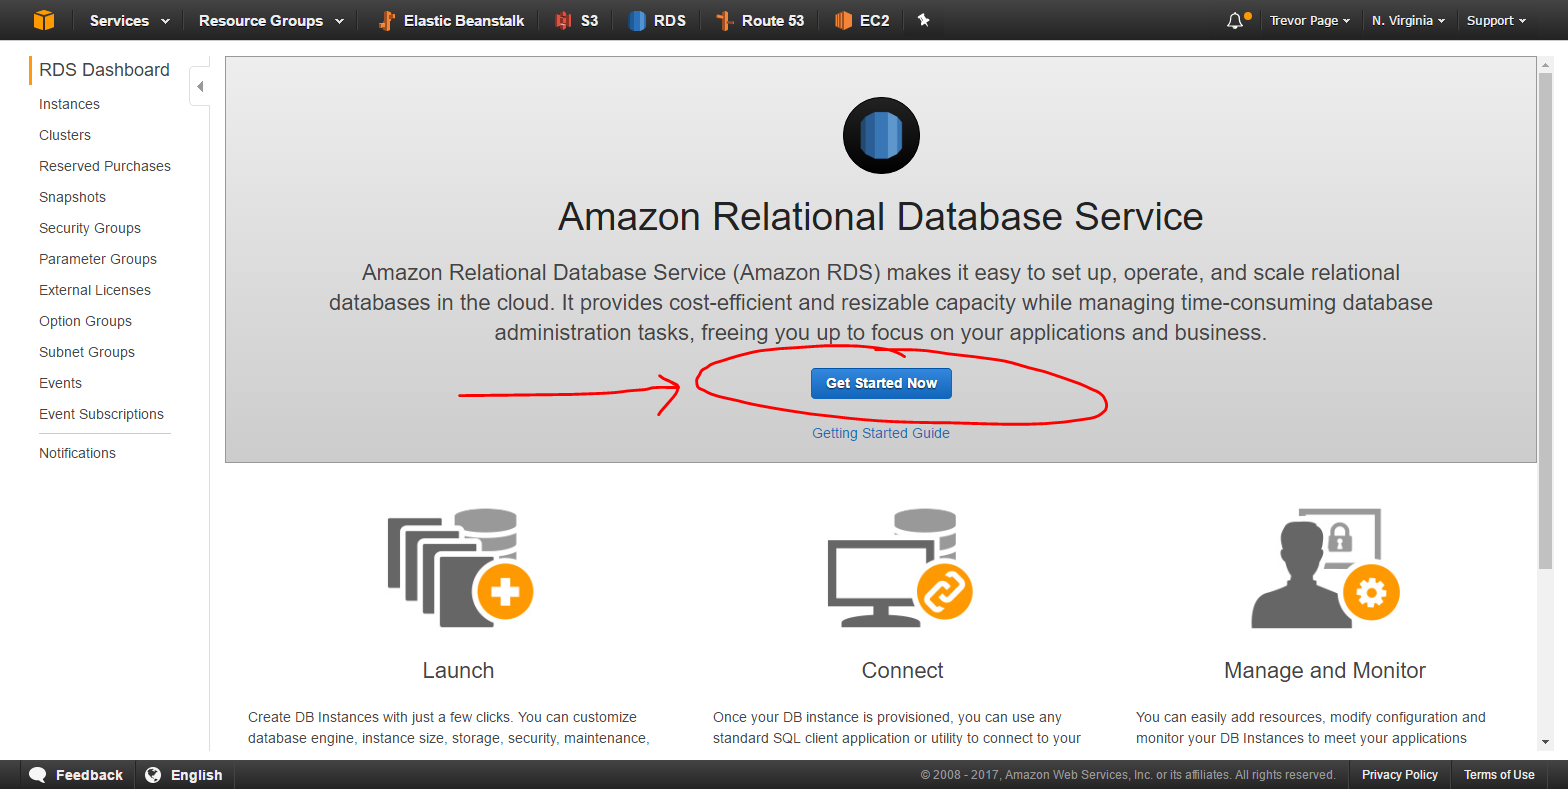
Click the “Get Started Now” button, or alternatively, if you've already created an RDS instance in the past, you'll need to click the “Launch a DB Instance” button:
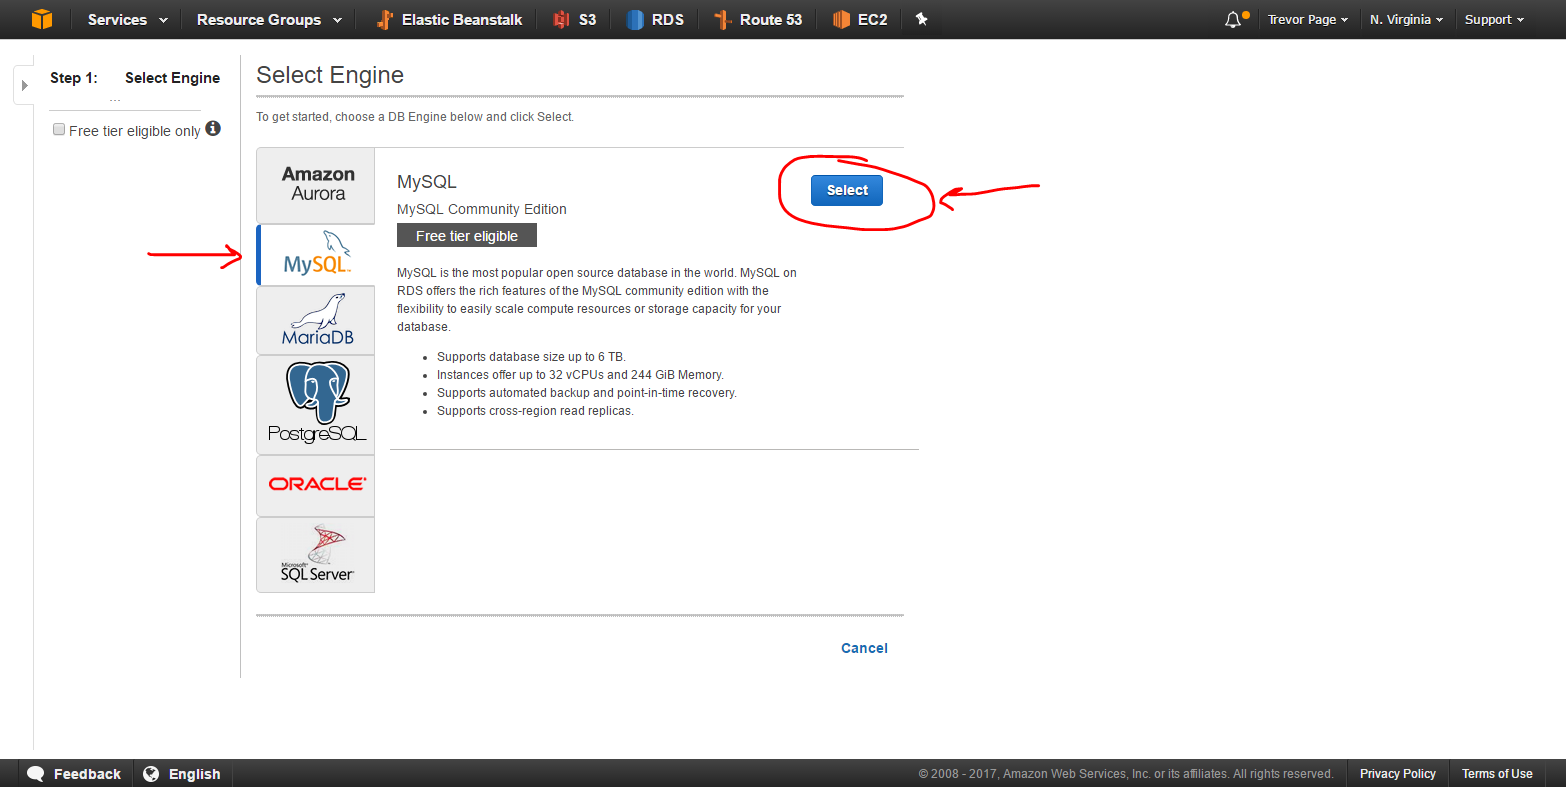
Then for this post, we'll be creating a MySQL instance. These tend to be the cheapest, as MySQL is a free technology, but you can feel free to choose whichever option best suits your needs.
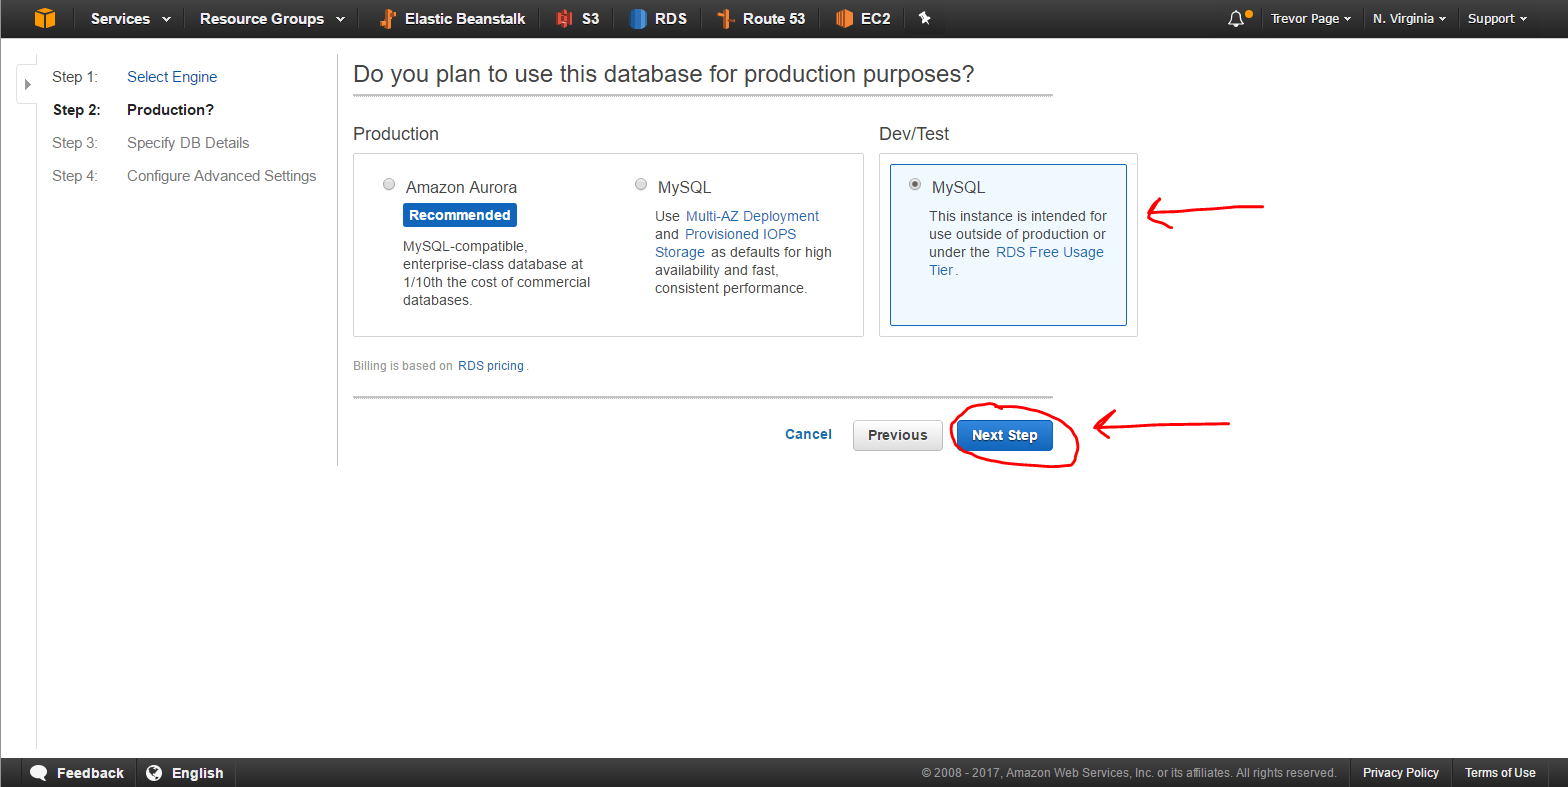
Then I choose to launch an instance under a Dev/Test profile (as opposed to a Production type DB instance) as we're just getting started and the DB we're launching won't likely be the one we use in a production environment… so you can save some cash by choose the free option (i.e. dev/test version of MySQL).
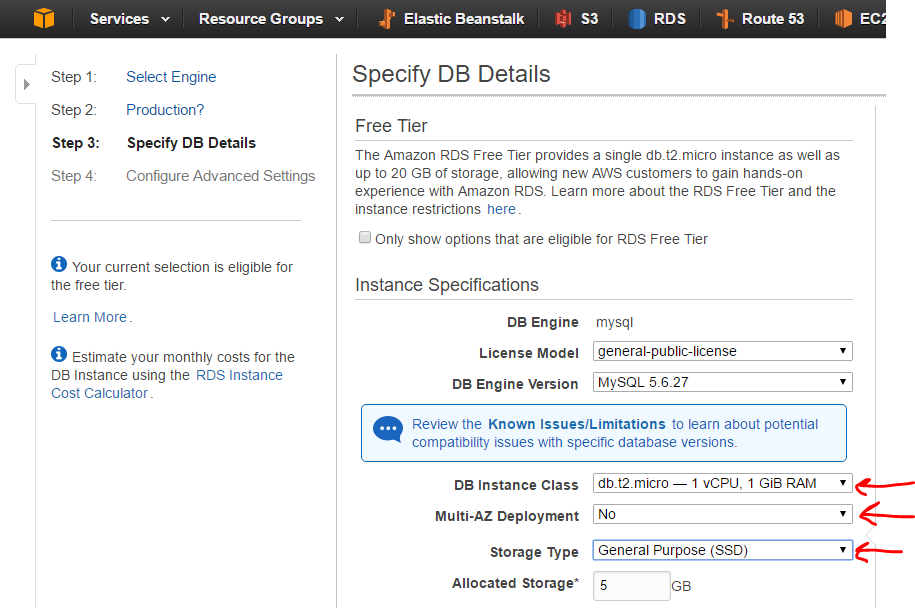
Next up we'll need to choose what kind of instance to run for the DB… in this case, I'd recommend you use the t2.micro instance as it's free tier eligible. Also, be sure to say “No” to the multi-AZ Deployment to stay on the free tier.
I also choose the minimum 5GB of General Purpose SSD storage. It's plenty fast and it'll get the job done in terms of size… as of the writing of this article, my entire Proffesso.com application only uses about 1.5 MB of data for 100 teachers and thousands of students.
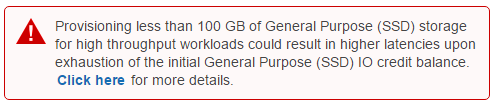
Note: Don't be intimidated by Amazon's warning regarding using less than 100GB of data… they're just trying to get more money out of you ;) 5GB is plenty of space for now… you can always expand it later (you can't shrink your DB however, sneaky sneaky Amazon).
Next up is your standard connection type information for your database. Choose a unique DB instance identifier. Note: this identifier is used to identify the AWS DB instance (not the name of the database).
You'll also set up your username / password that you'll use to connect to your DB.
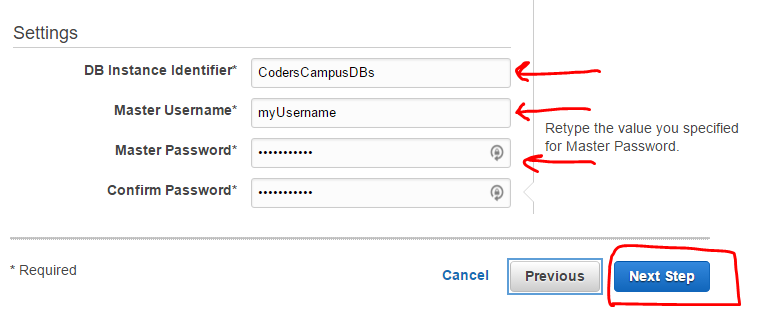
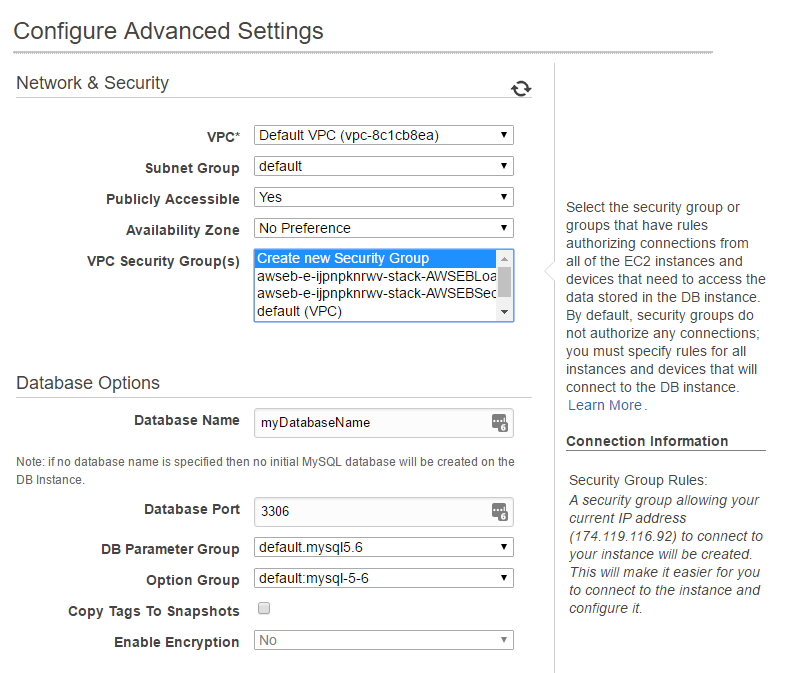
Then you'll need to give your database a name (among other things), for now I just assign a name and leave everything else set as the default you see below:
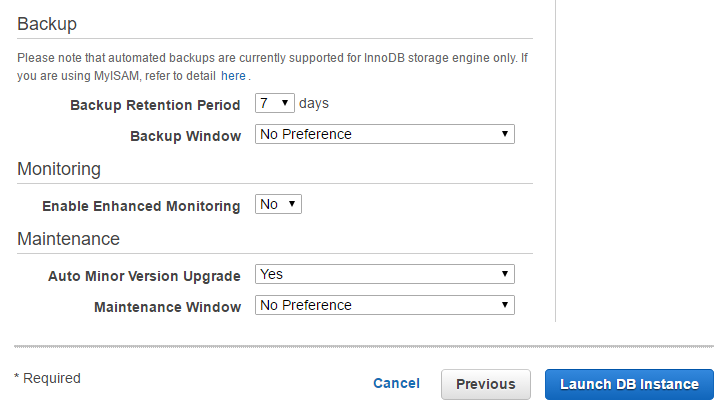
Now you're all set to launch your first Amazon RDS instance!
But don't get too excited, there's still a bunch of other configuration we'll need to do.
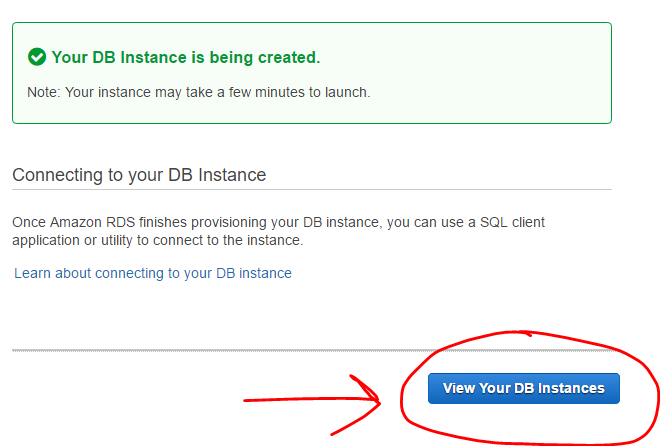
Go ahead and click on the “View Your DB Instance” button to watch the database get created before your very eyes… it usually takes about 10 minutes or so to get through the entire process of launching the instance to the point where it's available for use.
Step 6: Configure the Amazon RDS Instance
Once the status of your new DB instance changes from “creating” to “backing up” to “available” you'll be ready to start configuring things.
The first step here is to ensure that you can connect to your DB from outside of your VPC (virtual private cloud). At this moment, if you attempted to connect to your DB from your app or from a DB IDE (like Toad or Workbench) it wouldn't work.
So let's open up some ports so that we can connect to our new DB “from the outside”.
Note: as of the writing of this article in early 2017, it looks like AWS automatically creates an entry for your IP address to connect to the DB instance. So if all goes well, you should be able to connect to your DB instance as soon as it's created… but it still important to understand how these security settings are set up so that if ever your IP address changes, you'll be able to properly connect.
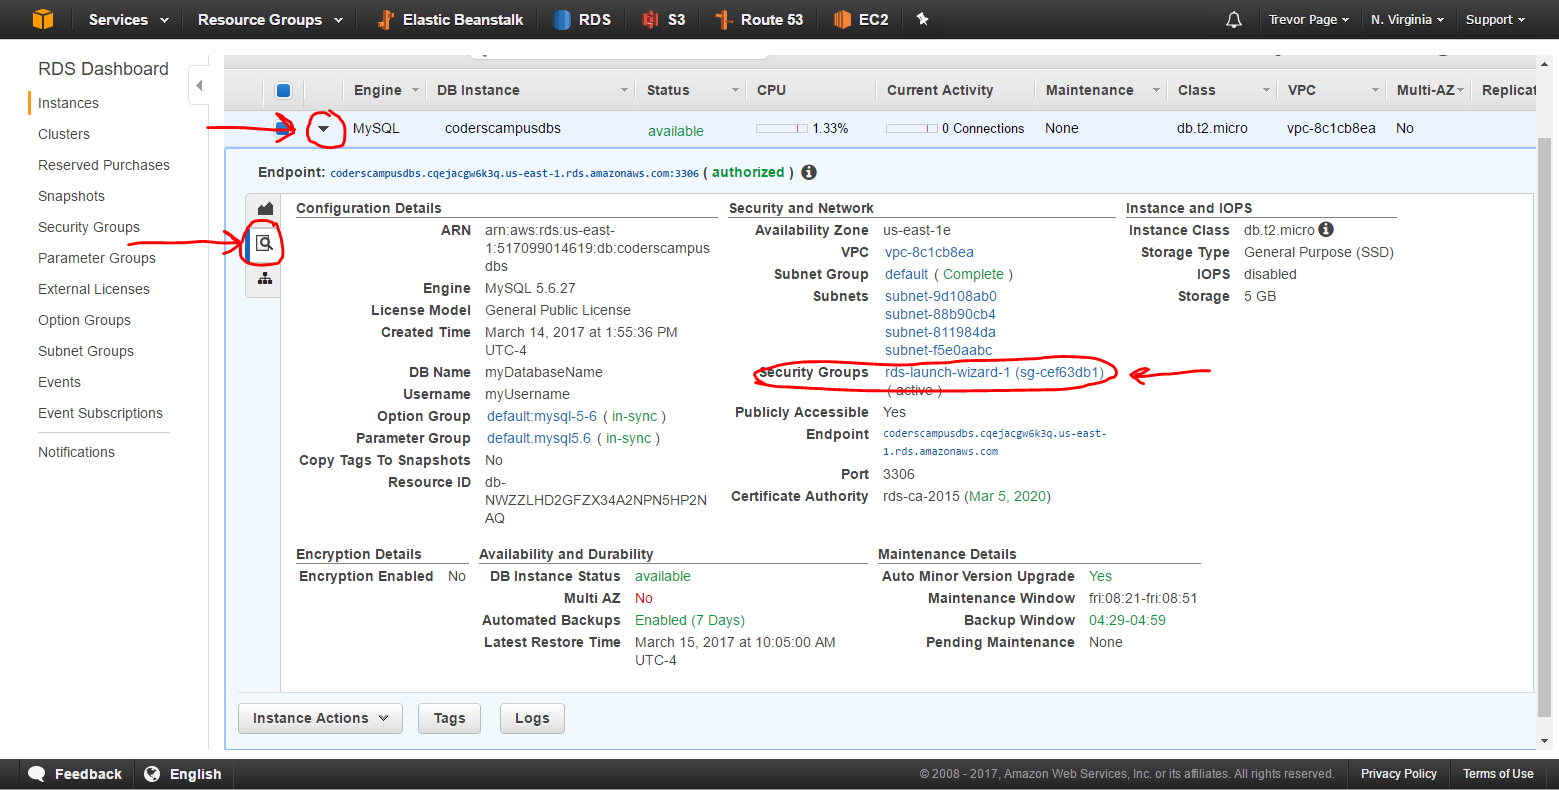
First step is to identify which security group was created for your DB instance.
To do this, click on the arrow to expand the details section of your DB. When you do this you'll be in the “monitoring” tab, but we'll need to click on the “details” tab on the left side of the DB information to see the security group information. See the screenshot below for more details:
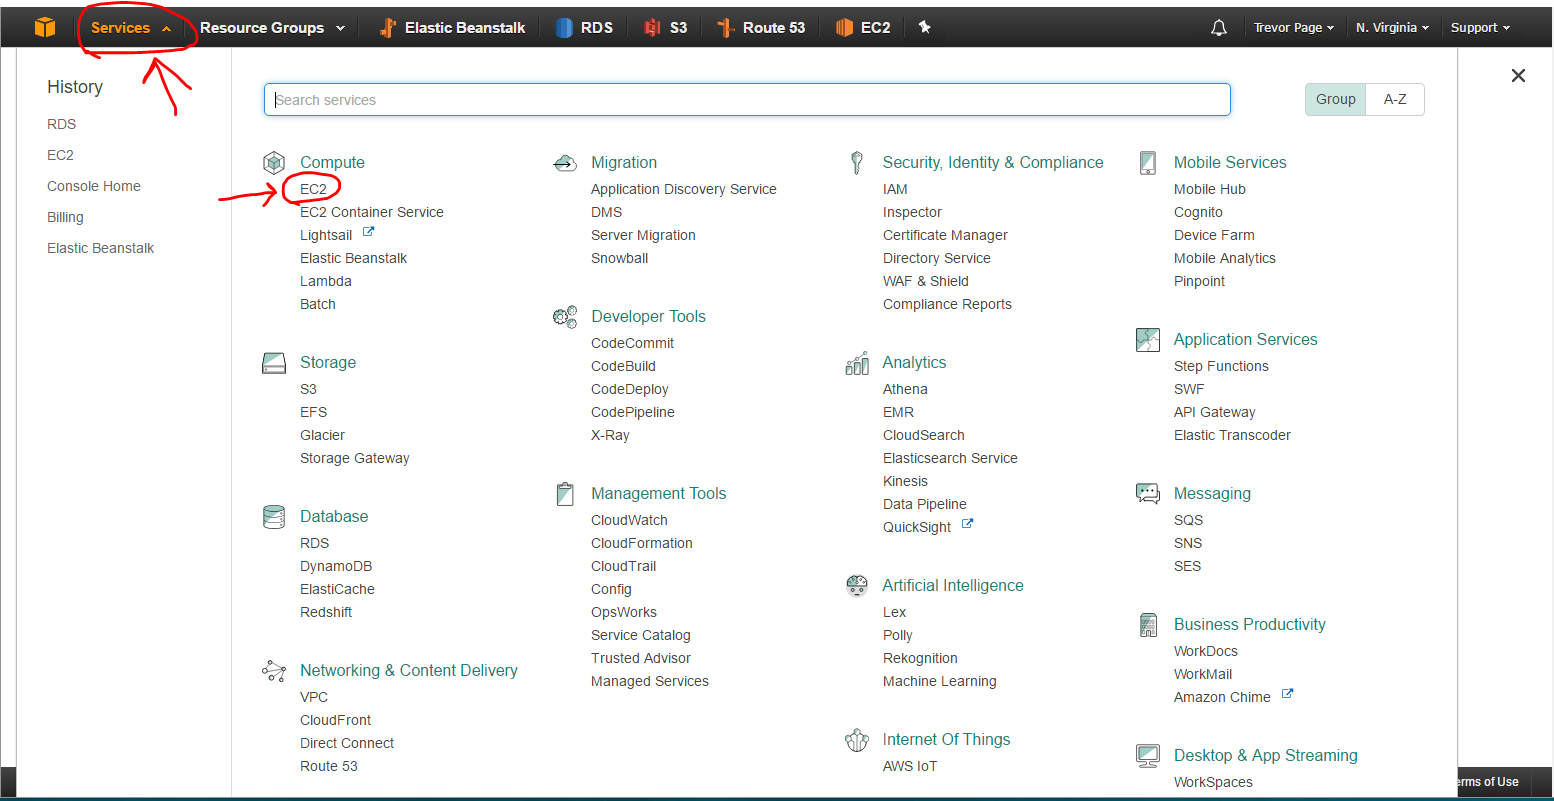
Armed with the information of knowing our security group (in this case the security group ID is sg-cef63db1) we can now head over to the EC2 page by clicking on “Services -> EC2”:
This will bring us to our EC2 page. From here, this is where we will need to edit our security groups for our EC2 instance. Click on the “Security Groups” option along the left side of the screen. Then we'll select our security group from before (sg-cef63db1) and we'll switch over to the “Inbound” rules.
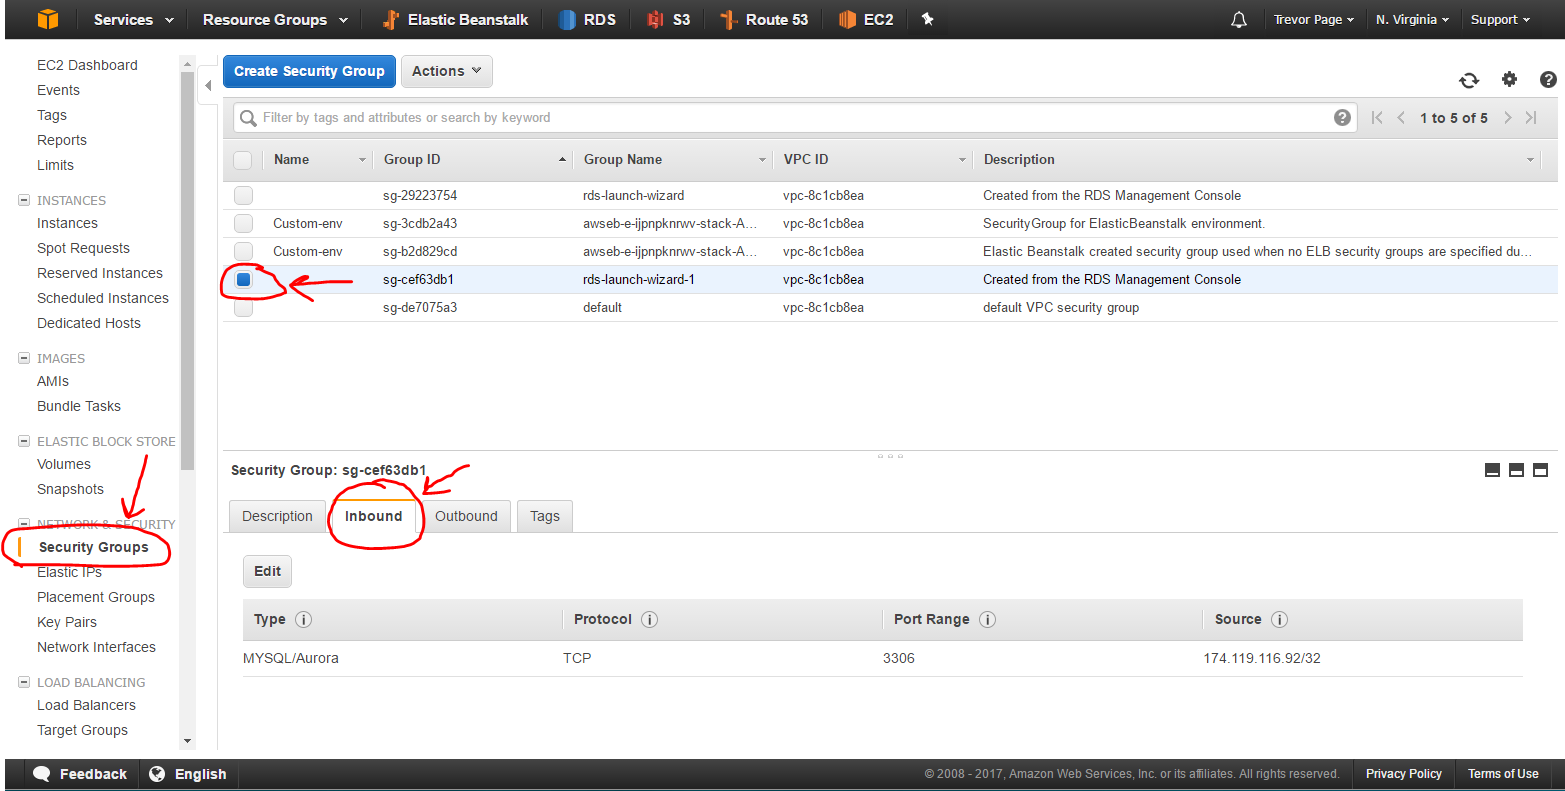
In the image above, you can see that it already has one rule, a “MYSQL/Aurora” rule that opens port 3306 for an IP address. The IP address you see in the screenshot was my IP address at the time this DB instance was created. If you don't have a line like this in your set up, here's how you add one… Click the “Edit” button to edit the “Inbound” rules and either edit the existing rule or add a new one like so:
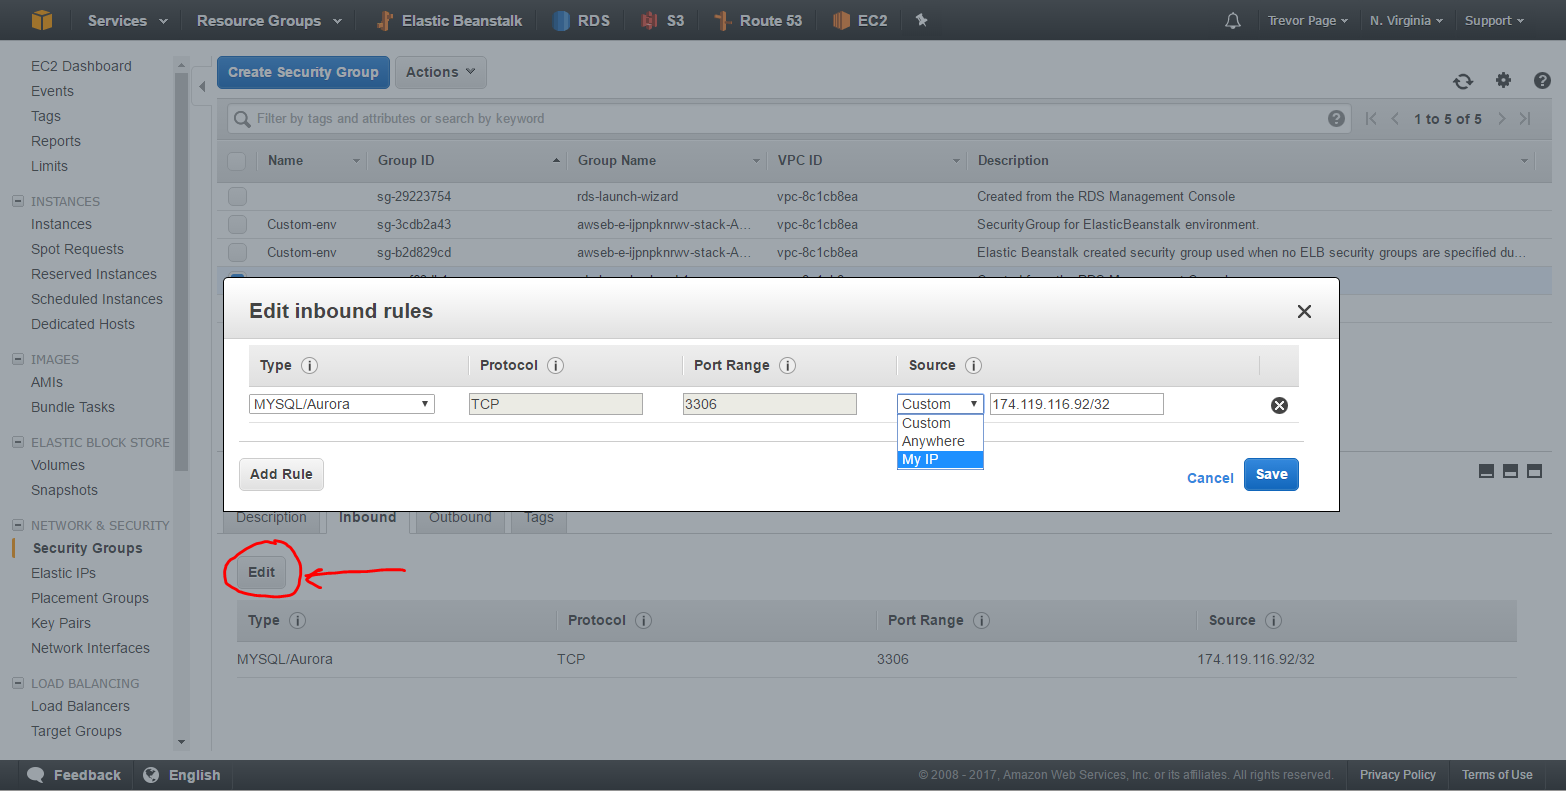
You can also choose to add a brand new rule and open it up so that it will allow all inbound traffic on port 3306. To do this, just choose the “Anywhere” option as the source like so:
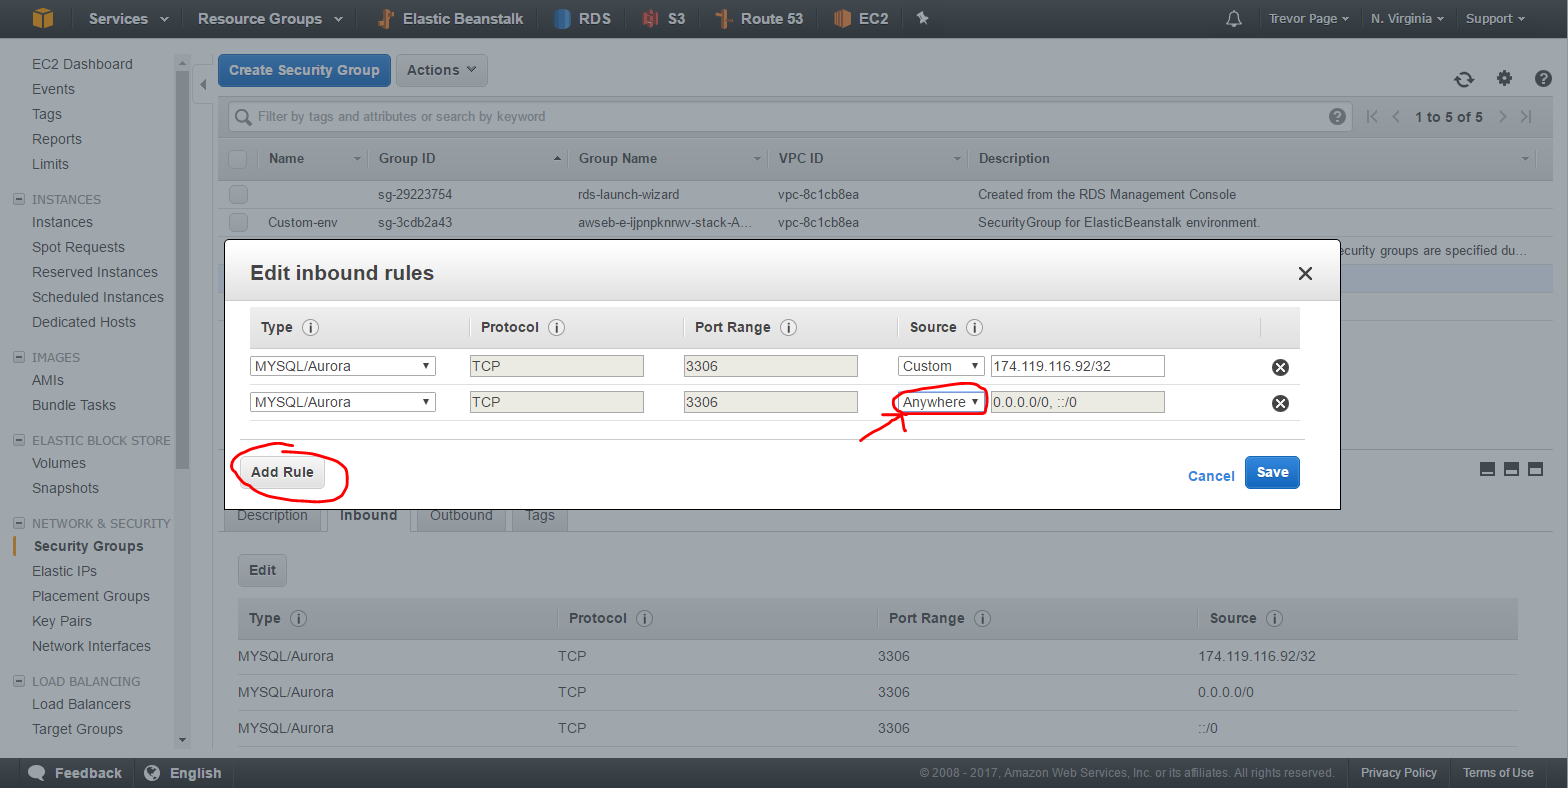
Now, it should go without saying that allowing any and all inbound traffic is a security risk. So I wouldn't suggest using that setting in production.
But having said that, your new DB instance should be ready to rock!
Step 7: Connect your code to the RDS Instance
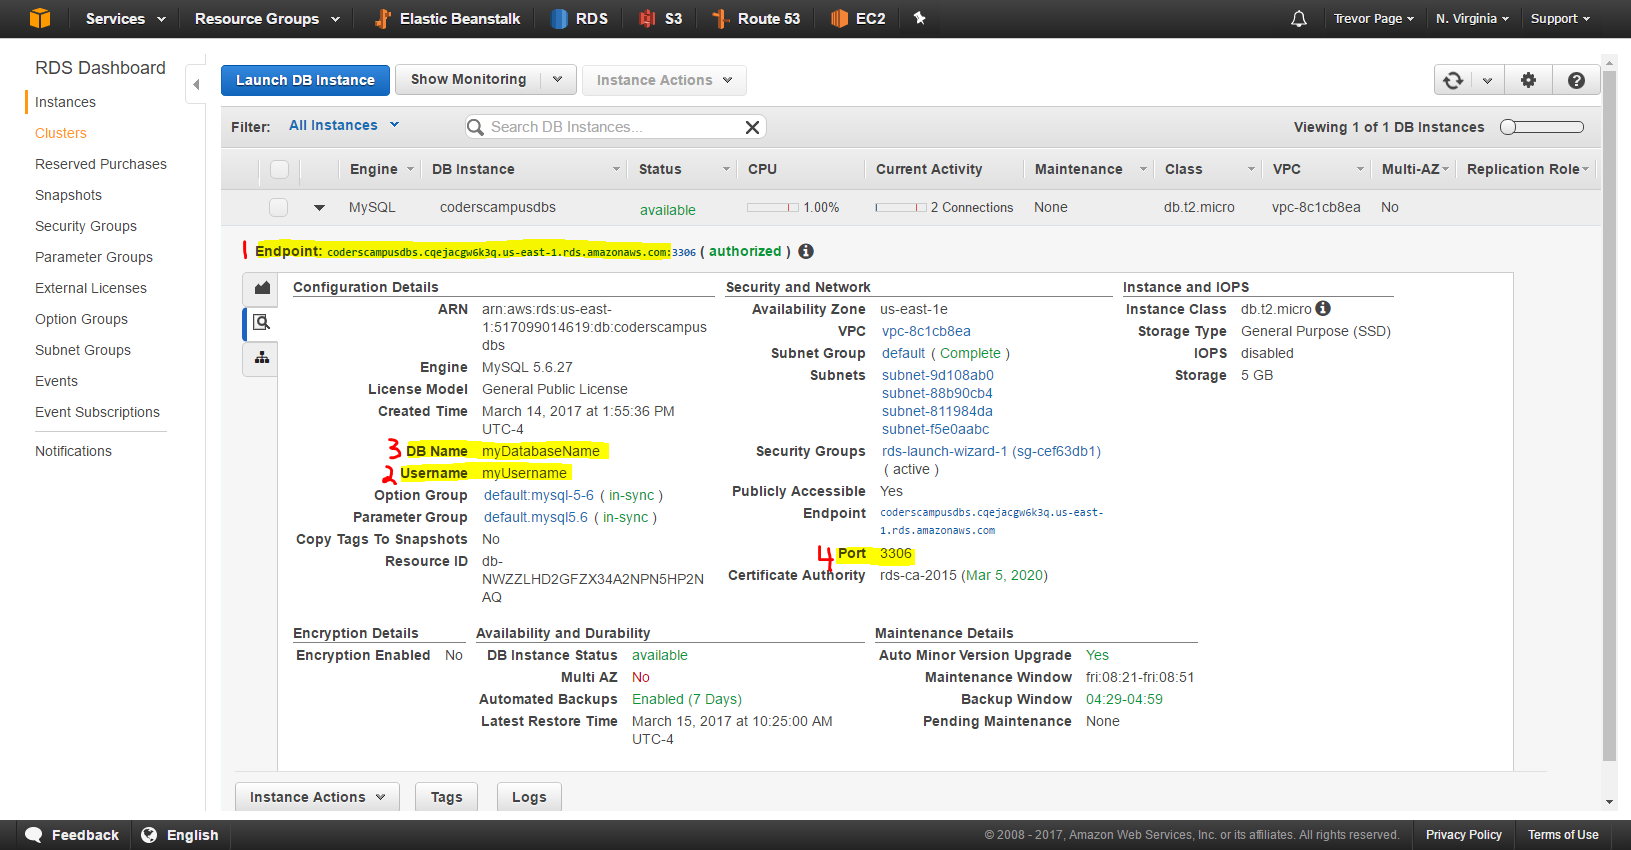
You can login to your DB instance using MySQL Workbench or Toad for MySQL using the following info:
- Host -> Endpoint (i.e. coderscampusdbs.cqejacgw6k3q.us-east-1.rds.amazonaws.com)
- Username -> myUsername
- Password -> [your password]
- Database -> myDatabaseName
- Port -> 3306
Note: all this connection information can be found on the details tab of your DB instance, I'll show another screenshot highlighting all these data points below:
Next, you'll need to connect your application's code to this database.
This is easily done via your properties file which you used to connect to your database previously.
If you're using a Spring Boot app, this can be found in your application.properties file.
Point a Domain Name to your Fancy new Hosted Application
Alright, so far you've got:
- Your application hosted in Elastic beanstalk – check
- Your database hosted in RDS and linked to your application – check
- A user friendly URL pointing to your application – not yet
We're so close to being completely done with launching our Java app into the cloud.
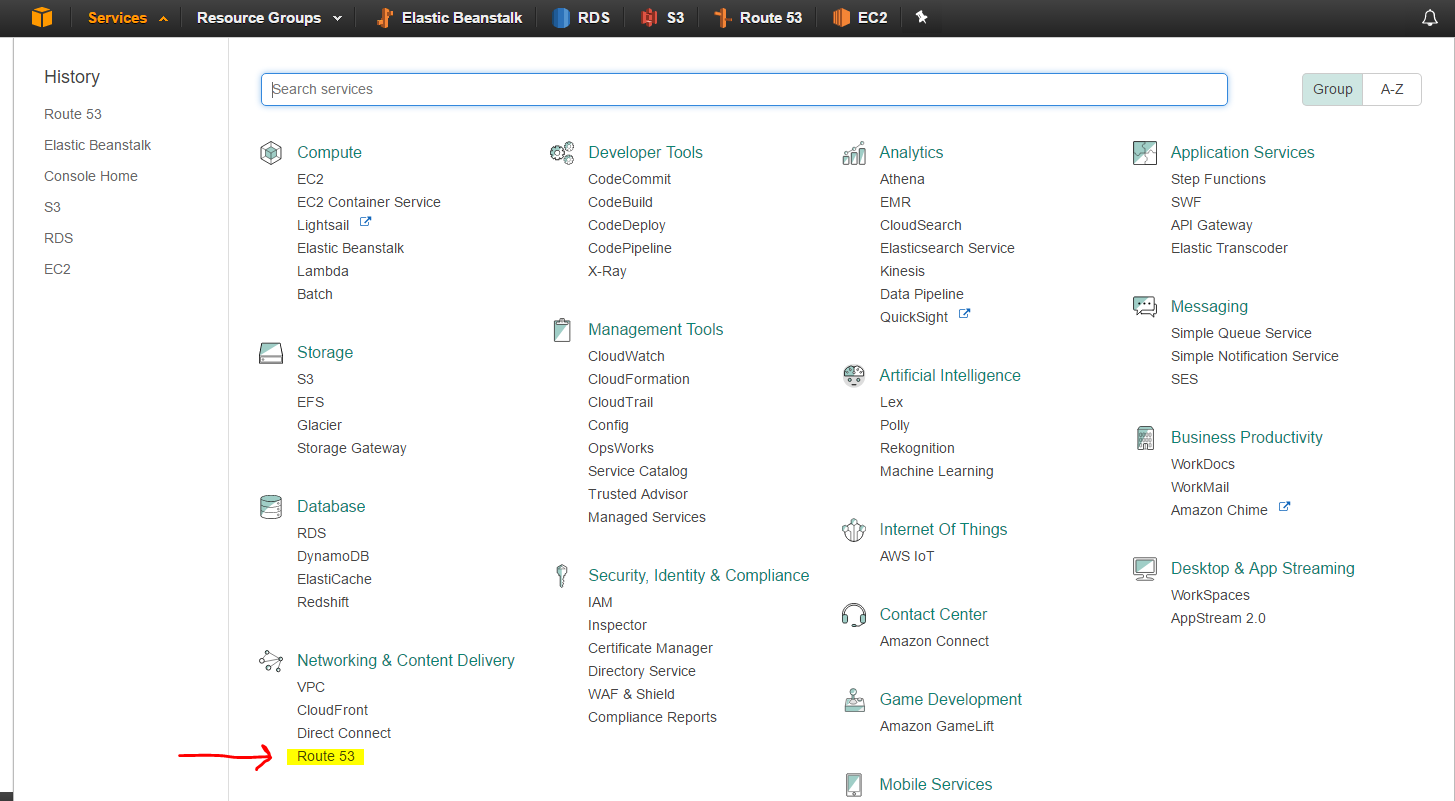
In order to get rid of the non-user friendly URL that Elastic Beanstalk assigns to your application, you'll need to make use of another AWS product called “Route 53”.
So let's hop on over to the Route 53 Product:
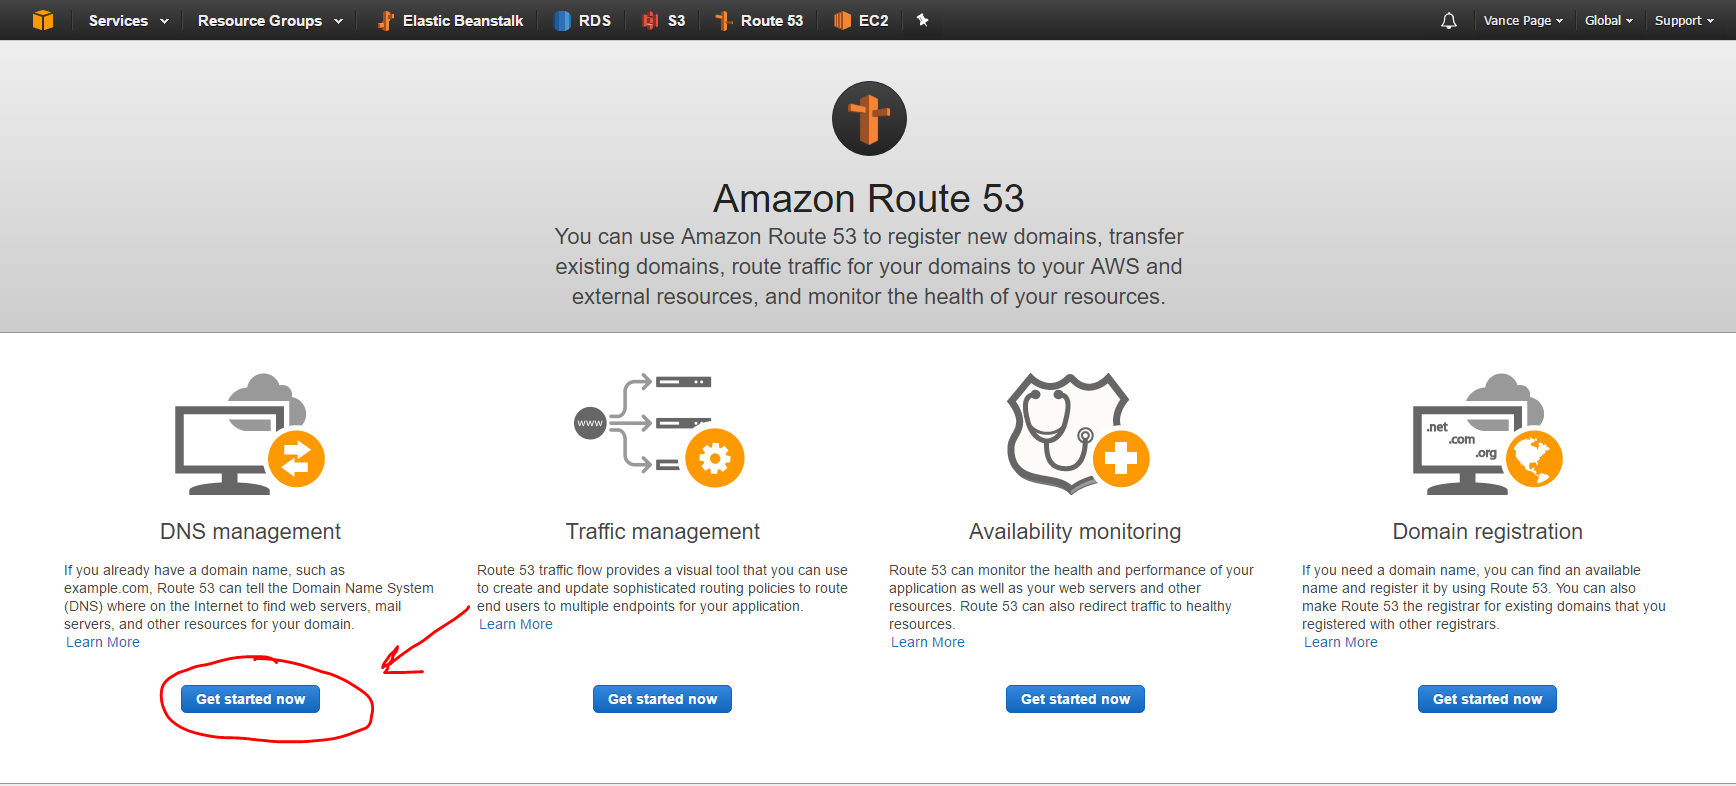
This will bring up a page that will likely look like the following screenshot… Click on the “Get Started” button:
Inside of Route 53, we can create “Hosted Zones” which allow us to forward our incoming HTTP traffic to our Elastic Beanstalk application from any domain we own.
So the only pre-requisite here is that you'll need to own a domain name that will forward to our Elastic Beanstalk application.
For this example, I'll be using a domain I own by the name of “businessoftech.com”. The final outcome will be that if someone navigates to businessoftech.com it will send them to my Java application.
So I'll show you how I created my own “Hosted Zone” using the businessoftech.com domain name (you'll obviously need to use a different domain name for your hosted zone):
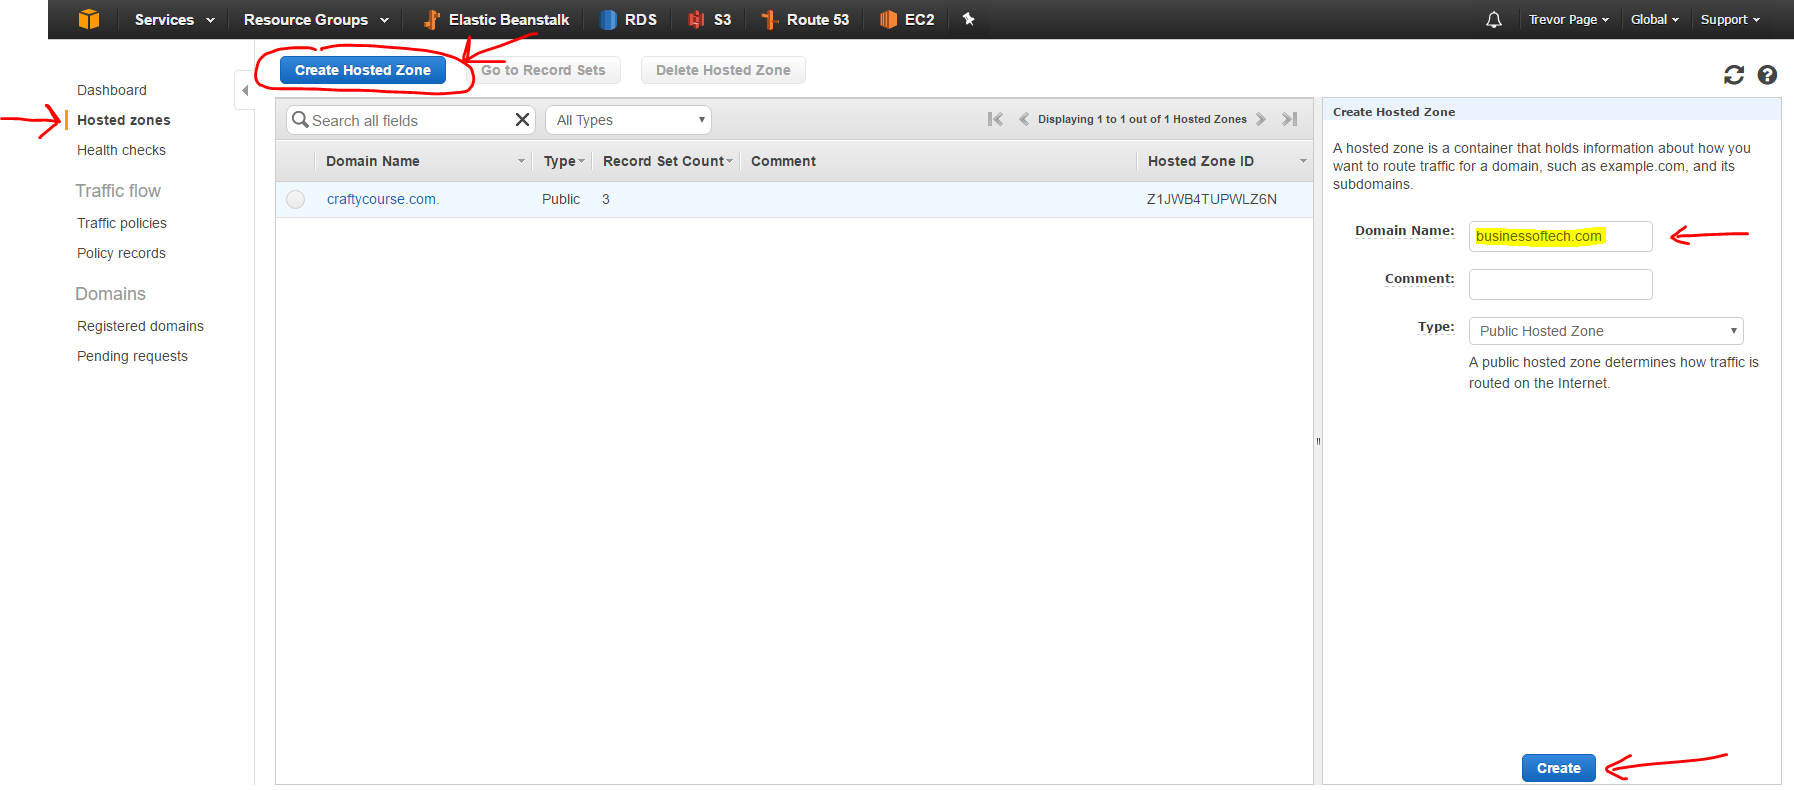
Once this hosted zone has been created, make note of the nameserver values in the “NS” row:
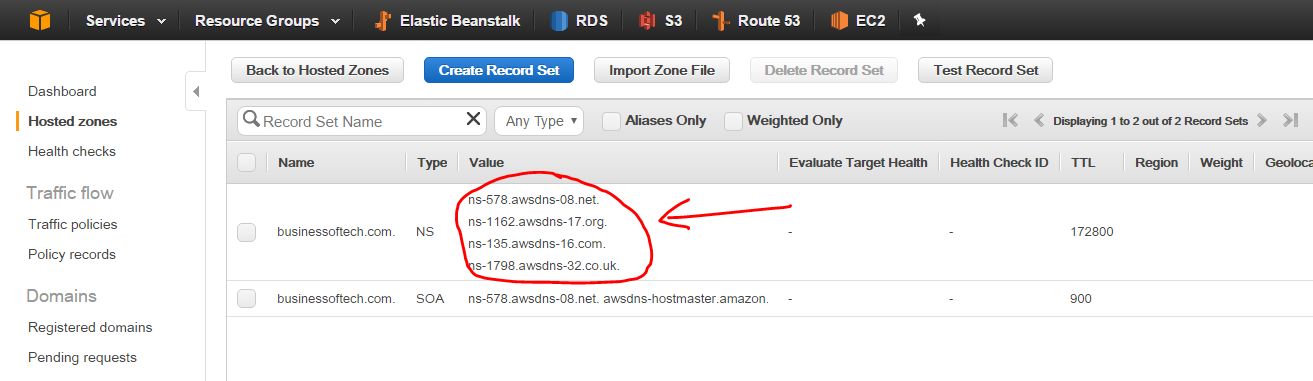
These nameservers are what you'll need to point your domain name to. How you do this will vary from provider to provider, but you can easily google the term “Change nameserver on domain with [xyz provider]”.
In my example, I use GoDaddy.com as my domain name provider. So I need to navigate to the DNS settings of my “businessoftech.com” domain and change the nameservers:
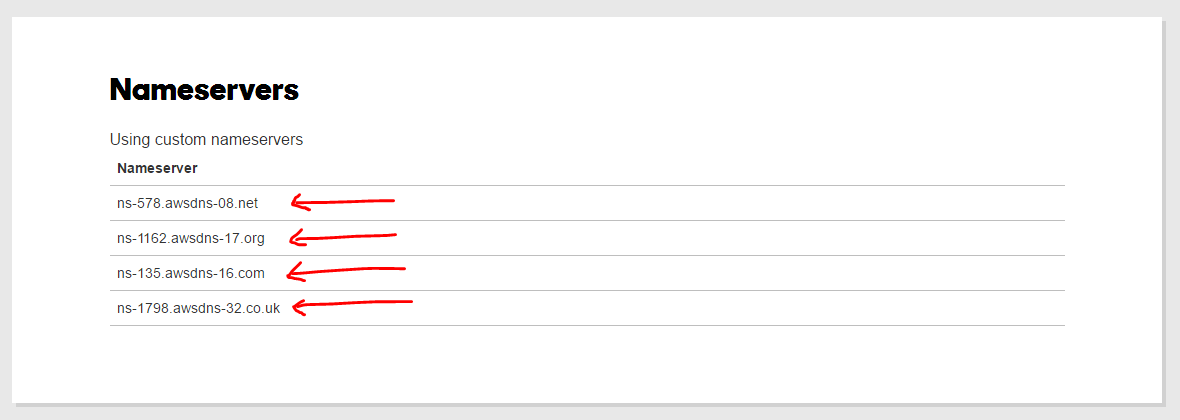
Note: this is what the GoDaddy nameserver settings look like, I needed to choose a “custom” setting for the nameservers inside of GoDaddy's settings.
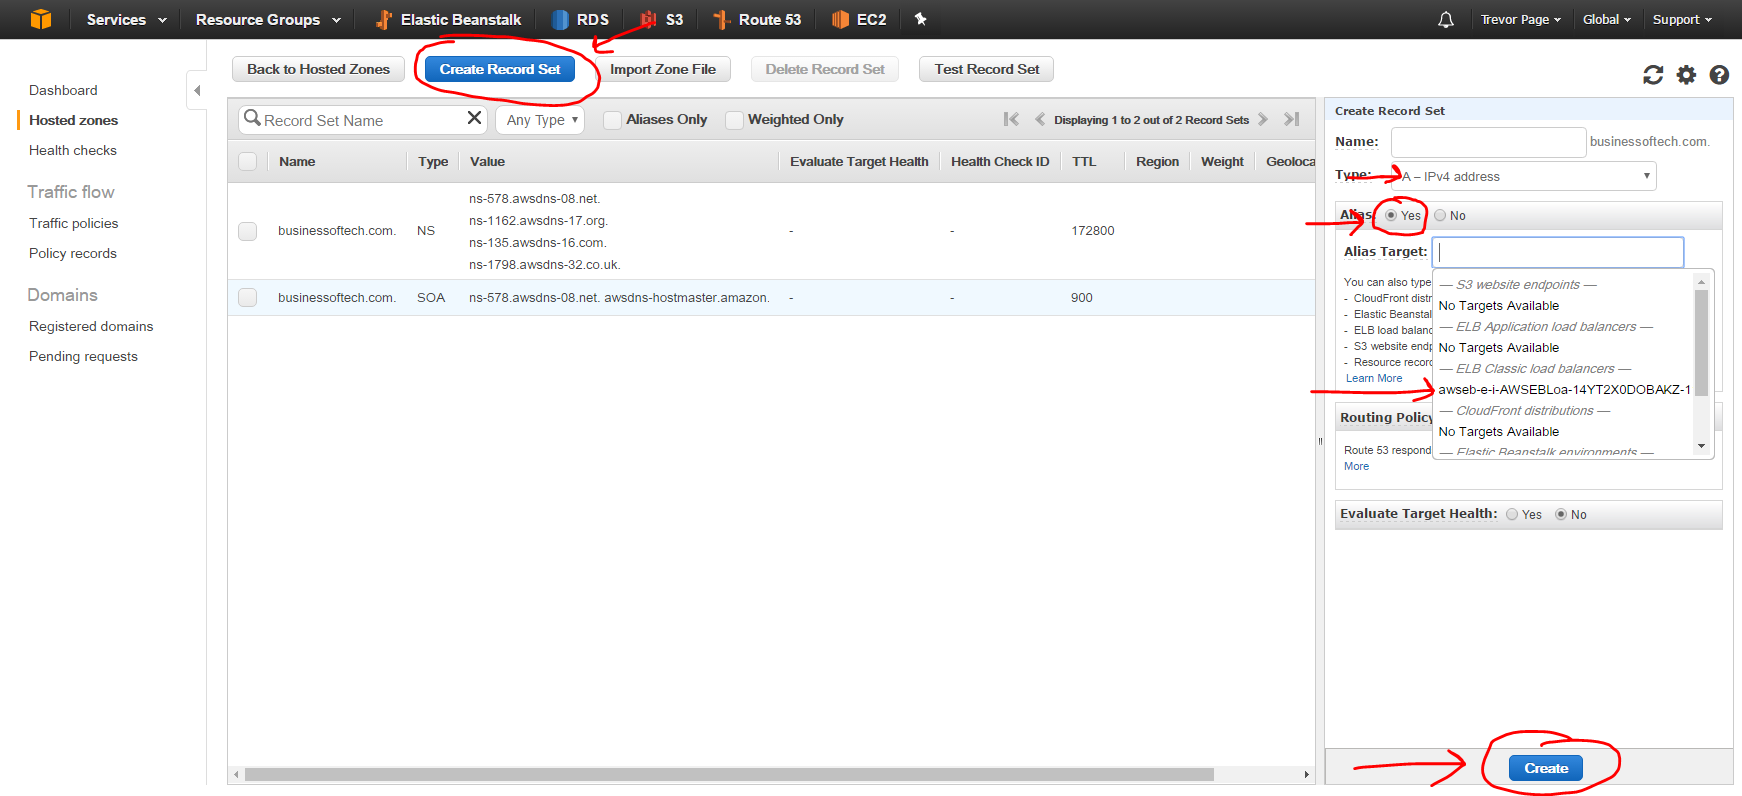
Once we've forwarded the domain's nameservers over to Route 53's nameservers, we're ready to create a “Record Set” inside of Route 53.
I could write a whole article on DNS settings and record types, but for now the only thing you need to know is that we need to create “A Records” inside of Route 53. These are the pieces of data that tell the interwebs where to go when someone accesses a domain name.
So we want to configure it so that when someone navigates to businessoftech.com it should point to the AWS app.
Here's how we do that!
Create a new “Record Set”, it defaults to an “A Record” type, so we just need to set the alias to be “yes” and point it to our elastic beanstalk app:
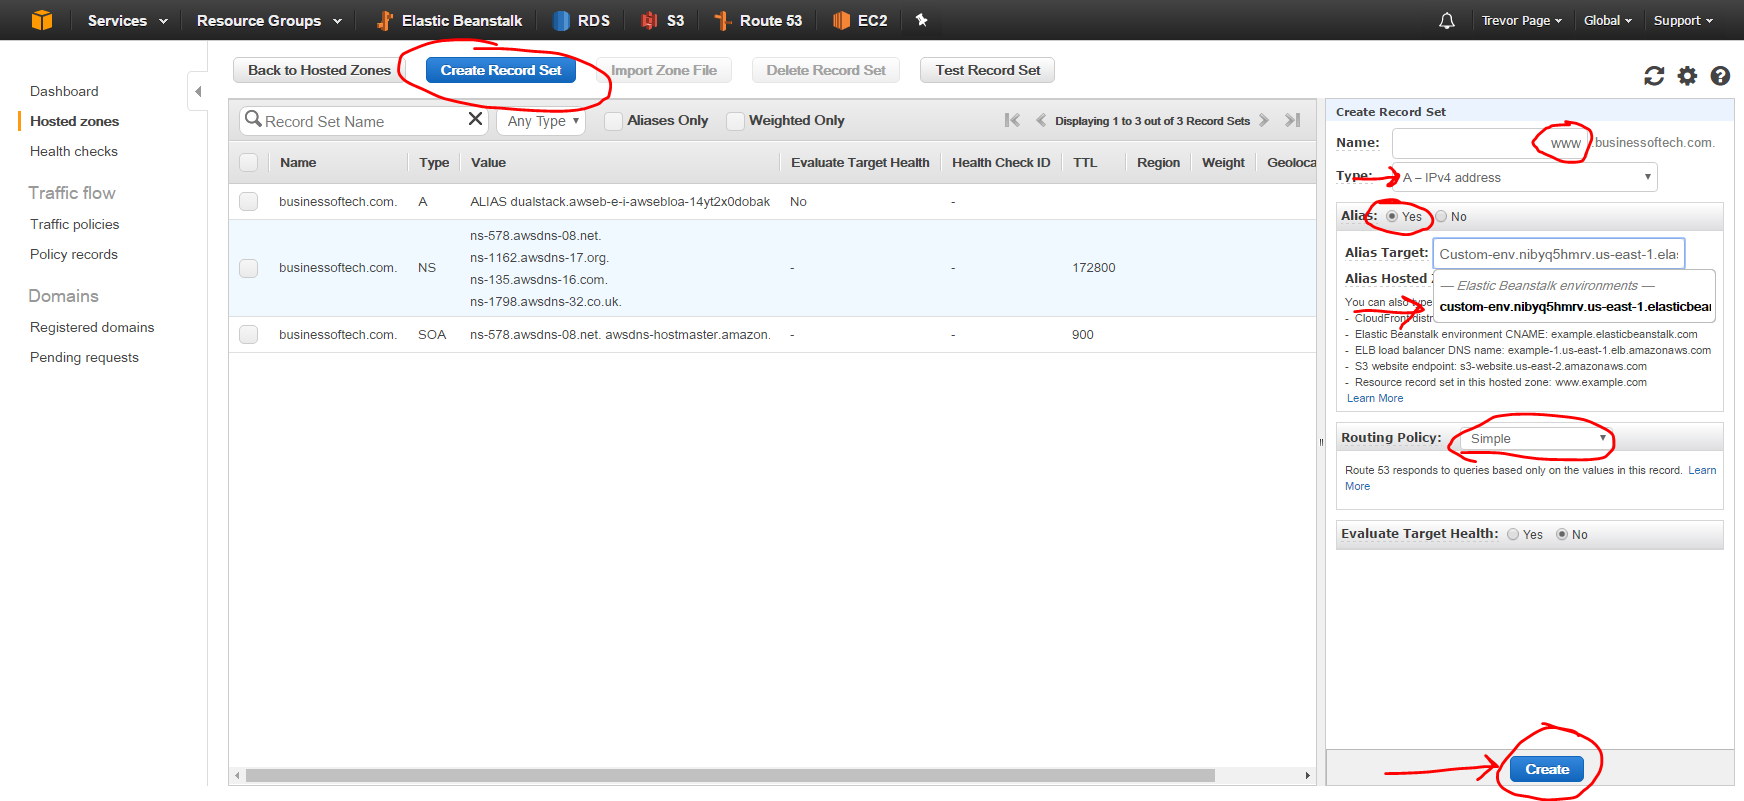
Optionally, you might also want to point a subdomain to the same place as well. A common subdomain is “www”. So if someone navigates to www.businessoftech.com, it will also go to the app in AWS.
Create another record set, but this time set the “name” to be “www” like so:
Now, I'd like to say that we're done.
And we pretty much are done at this point.
But the only thing you need now, is patience (which can be very difficult for programmers).
You'll need to wait between 5 minutes and a few hours for these changes to take effect.
This means that even though we've set everything up properly, if you go to “businessoftech.com” (or whatever domain name YOU were using), it still won't be pointing to our application.
You just need to wait.
When I ran through this test, it took about 25 minutes before the changes propagated and I actually saw the domain forwarding to the app.
From my limited experience with this DNS stuff, I've noticed that if you live in the USA, the changes will likely propagate quickly (5 minutes or so) and if you live in Canada it takes about (20 – 30 minutes). If you live in a country without solid internet infrastructure, it can take much longer. I've seen DNS changes take hours in India.
So, go get a cup of tea, or make yourself a meal and forget about all this work you just did.
After you've taken a break, come back and try to navigate to your domain name and see if it's now pointing to your application.
If you've waited hours, and still nothing is working, then maybe go back over all these steps and see if you may have missed something.